Help People in Iran Access the Free Internet
Set up a Hiddify VPN server on AWS in under 30 minutes. No technical experience needed.
Get Started
به مردم ایران کمک کنید تا به اینترنت آزاد دسترسی پیدا کنند
در کمتر از ۳۰ دقیقه یک سرور VPN با Hiddify روی AWS راهاندازی کنید. نیازی به دانش فنی نیست.
قطعی ۸۸ روزه اینترنت ایران، طولانیترین در تاریخ معاصر، در ۵ خرداد ۱۴۰۵ پایان یافت، اما اینترنت با سانسور سنگین بازگشت: فیلترینگ DPI و SNI، در حالی که ایکس و اینستاگرام همچنان مسدودند. یک سرور Hiddify با مسیریابی CDN دقیقاً همان چیزی است که همین حالا این فیلترینگ را میشکند. یکی راهاندازی کنید تا مخاطبینتان همین امروز وصل شوند (و برای قطعی بعدی هم آماده بمانید).
شروع کنیدHow It Works
You set up a server
Launch a Hiddify server on AWS from your browser. It takes a few clicks and about 30 minutes.
Hiddify creates secure connections
The server sets up encrypted proxy connections that are built to get past censorship filters.
People in Iran connect
Share a QR code or link. They scan it in the Hiddify app and instantly access the free internet.
نحوه کار
شما یک سرور راهاندازی میکنید
یک سرور Hiddify روی AWS از طریق مرورگر خود راهاندازی کنید. فقط چند کلیک و حدود ۳۰ دقیقه وقت نیاز دارد.
Hiddify اتصالات امن ایجاد میکند
سرور اتصالات رمزگذاریشدهای ایجاد میکند که از فیلترهای سانسور عبور میکنند.
مردم در ایران متصل میشوند
یک کد QR یا لینک به اشتراک بگذارید. آنها آن را در اپلیکیشن Hiddify اسکن میکنند و فوراً به اینترنت آزاد دسترسی پیدا میکنند.
What You Need
- An AWS account (credit card required; create one here)
- A web browser (Chrome, Firefox, Safari, Edge, any will work)
- About 30 minutes of your time
- No coding or technical knowledge; we'll walk you through everything
چه چیزهایی نیاز دارید
- یک حساب AWS (کارت اعتباری لازم است)
- یک مرورگر وب (هر مرورگری کار میکند)
- حدود ۳۰ دقیقه وقت
- نیازی به دانش برنامهنویسی نیست؛ همه چیز را قدم به قدم توضیح میدهیم
Step-by-Step Tutorial
Open the AWS Marketplace Listing
Click the link below to open the Hiddify VPN server listing on AWS Marketplace:
Open Hiddify on AWS Marketplace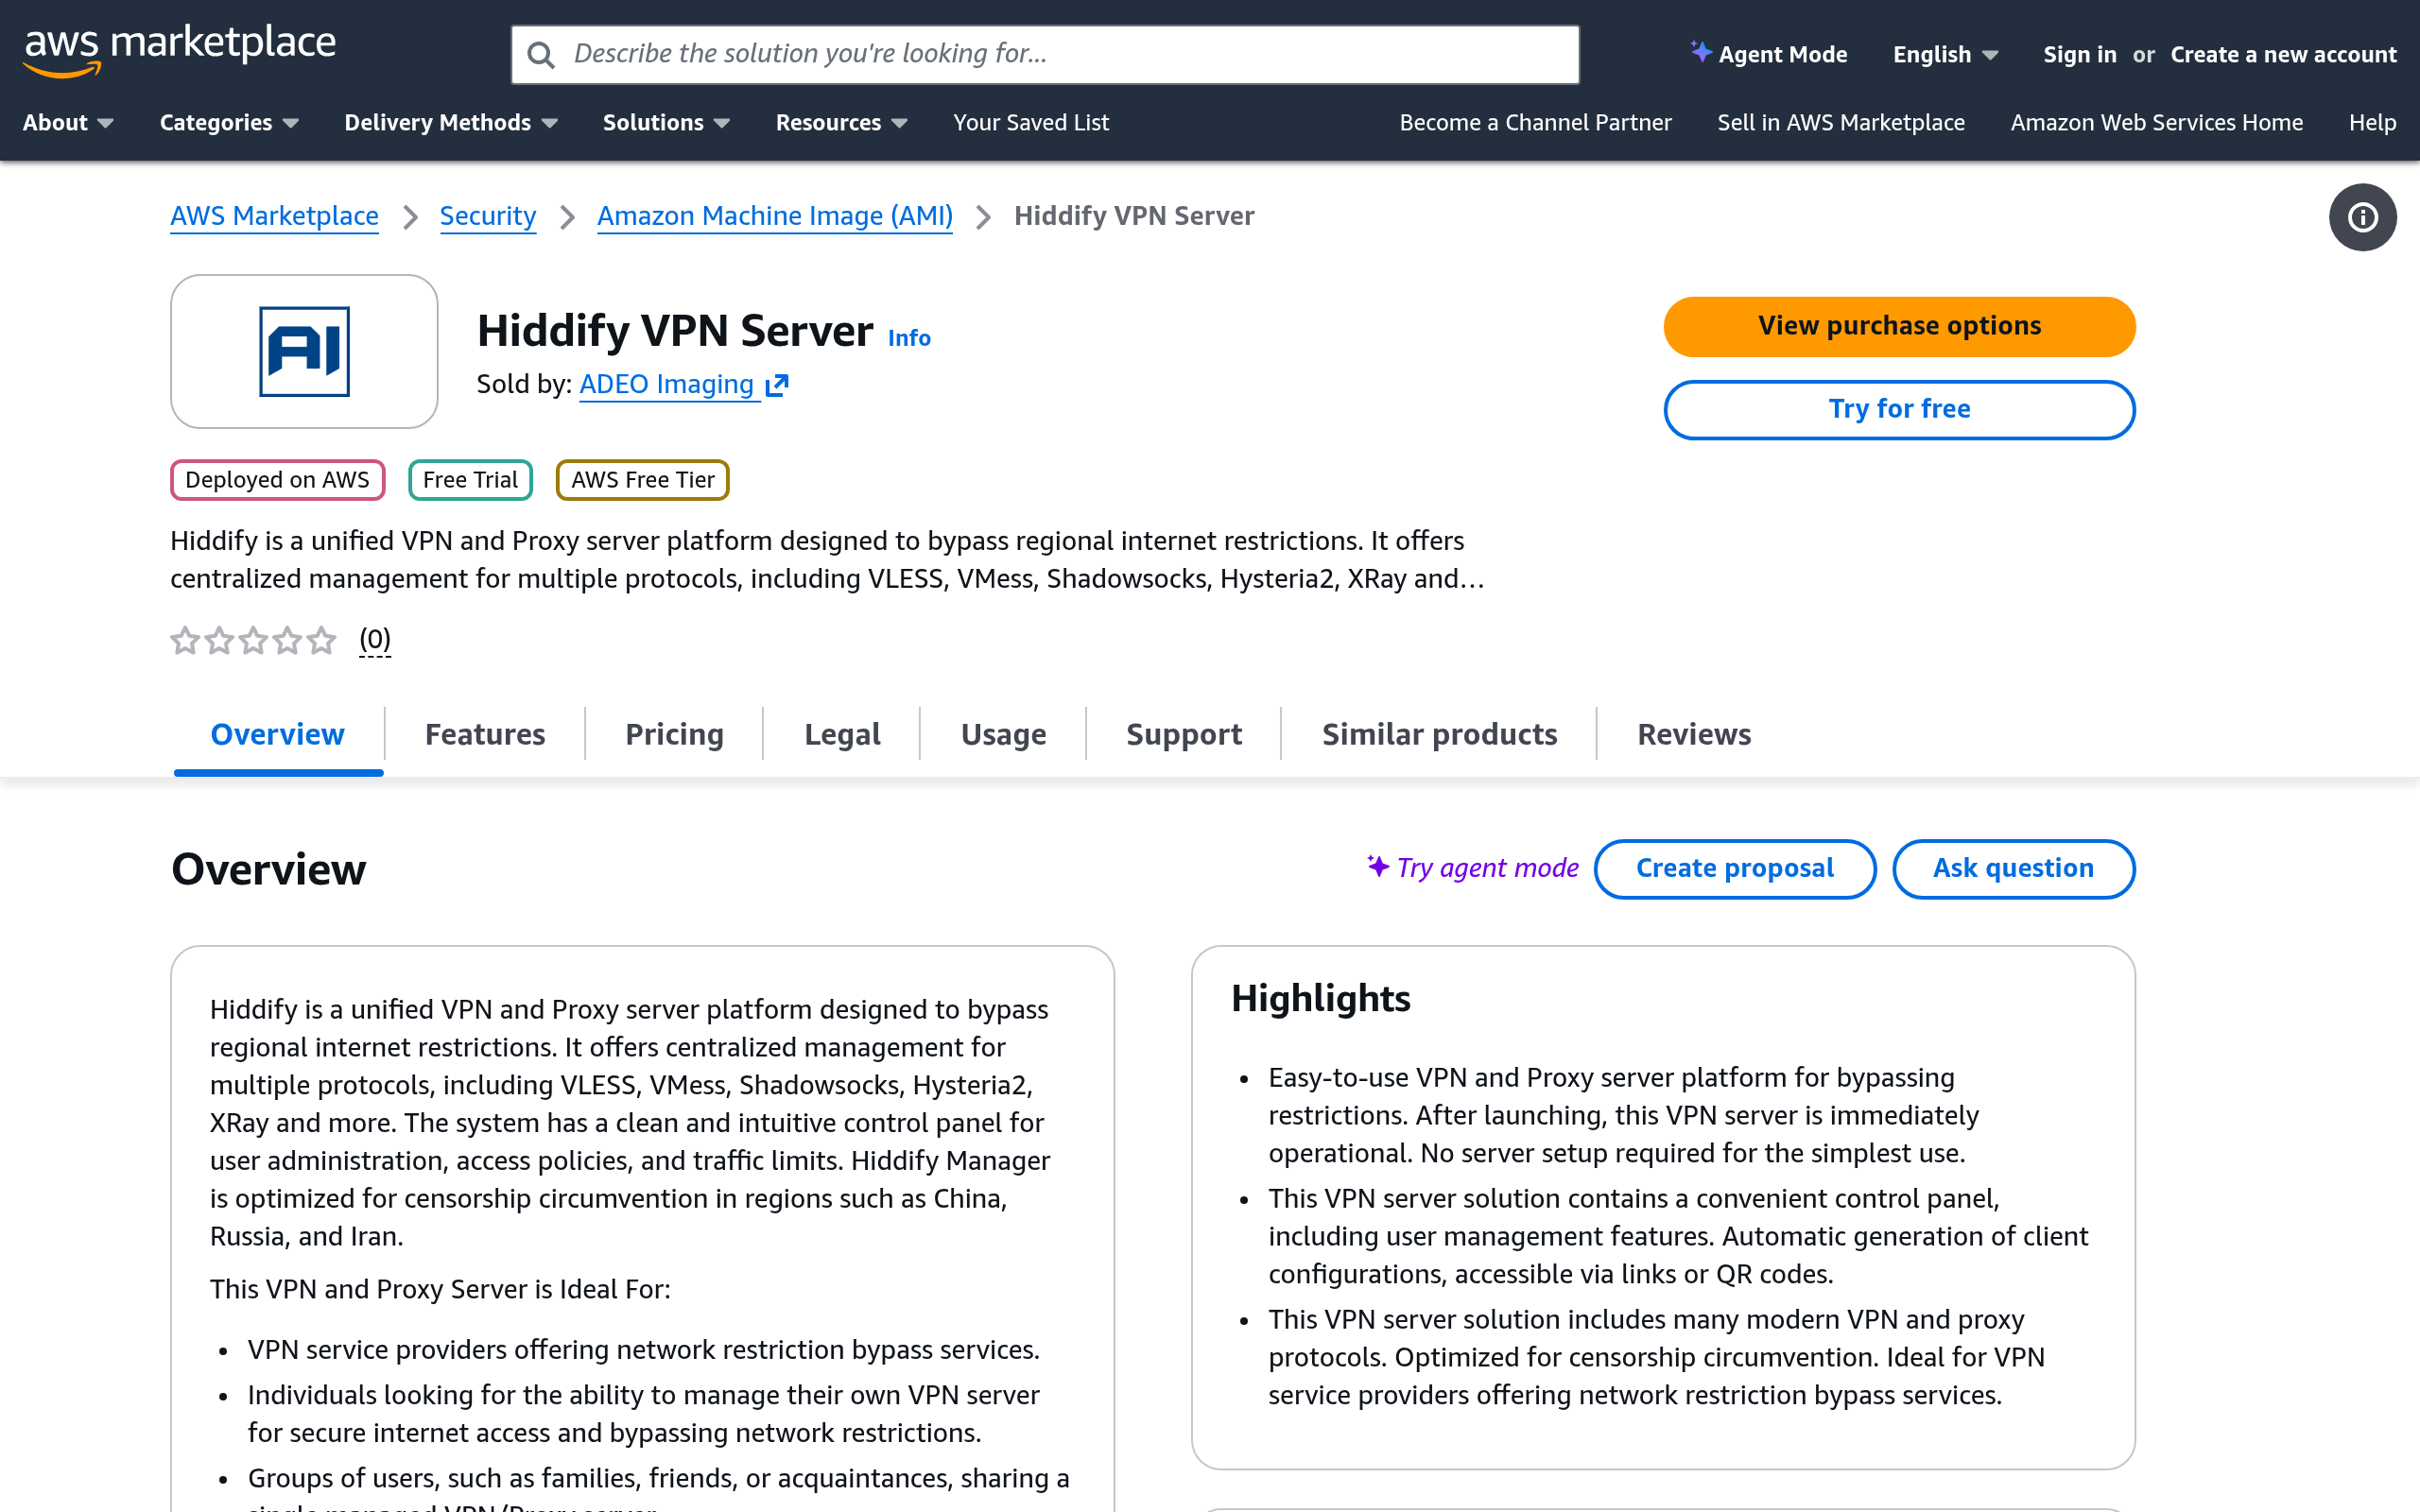
روی لینک بالا کلیک کنید تا صفحه محصول Hiddify VPN Server در AWS Marketplace باز شود. وقتی صفحه باز شد، یک دکمه نارنجی رنگ با عنوان «Try for free» خواهید دید. روی آن کلیک کنید. تصویر بالا را ببینید.
اگر هنوز حساب AWS ندارید، از شما خواسته میشود یک حساب بسازید. ساخت حساب حدود ۱۰ دقیقه طول میکشد و نیاز به کارت اعتباری دارد.
Subscribe to Hiddify
After clicking "Try for free", you'll land on a long, intimidating subscription page. Don't worry. You can ignore most of it. Here's what to do:
- Under "Purchase details", make sure "Usage based" is selected (it should be by default). Do not select the annual contract option.
- Ignore the "Offer summary", "Pricing details" table, "Usage cost" table, and "Purchase order (PO) number" sections. You don't need to change anything there.
- Scroll all the way to the bottom of the page.
- You'll see a note saying "Your free trial automatically converts to a paid subscription when it ends." This is normal.
- Click the orange "Subscribe" button at the bottom right.
- You'll see a green success message: "You've successfully purchased the usage based contract for Hiddify VPN Server." Click "Launch your software".


بعد از کلیک روی «Try for free»، وارد یک صفحه طولانی اشتراک میشوید. نگران نباشید؛ بیشتر قسمتهای آن را میتوانید نادیده بگیرید. مراحل زیر را دنبال کنید:
- در بخش «Purchase details» مطمئن شوید که «Usage based» انتخاب شده باشد (بهطور پیشفرض انتخاب شده است). گزینه قرارداد سالانه را انتخاب نکنید.
- بخشهای «Offer summary»، «Pricing details»، «Usage cost» و «Purchase order (PO) number» را نادیده بگیرید. نیازی به تغییر هیچکدام نیست.
- تا انتهای صفحه اسکرول کنید.
- یادداشتی خواهید دید که میگوید دوره آزمایشی رایگان بهطور خودکار به اشتراک پولی تبدیل میشود. این عادی است.
- روی دکمه نارنجی «Subscribe» در پایین سمت راست کلیک کنید.
- یک پیام سبز موفقیتآمیز خواهید دید. روی «Launch your software» کلیک کنید.
تصاویر بالا را ببینید: تصویر اول بالای صفحه اشتراک را نشان میدهد (مطمئن شوید «Usage based» آبی رنگ انتخاب شده)، تصویر دوم پایین صفحه و دکمه «Subscribe» را نشان میدهد، و تصویر سوم پیام سبز موفقیت را نشان میدهد.
نکته: شما ۵ روز آزمایشی رایگان دارید. بعد از آن حدود ۵۰ دلار/ماه هزینه نرمافزار + ۸ تا ۱۵ دلار/ماه هزینه سرور خواهد بود. برای صرفهجویی، روش جایگزین ارزان را ببینید.
Configure and Launch the Server
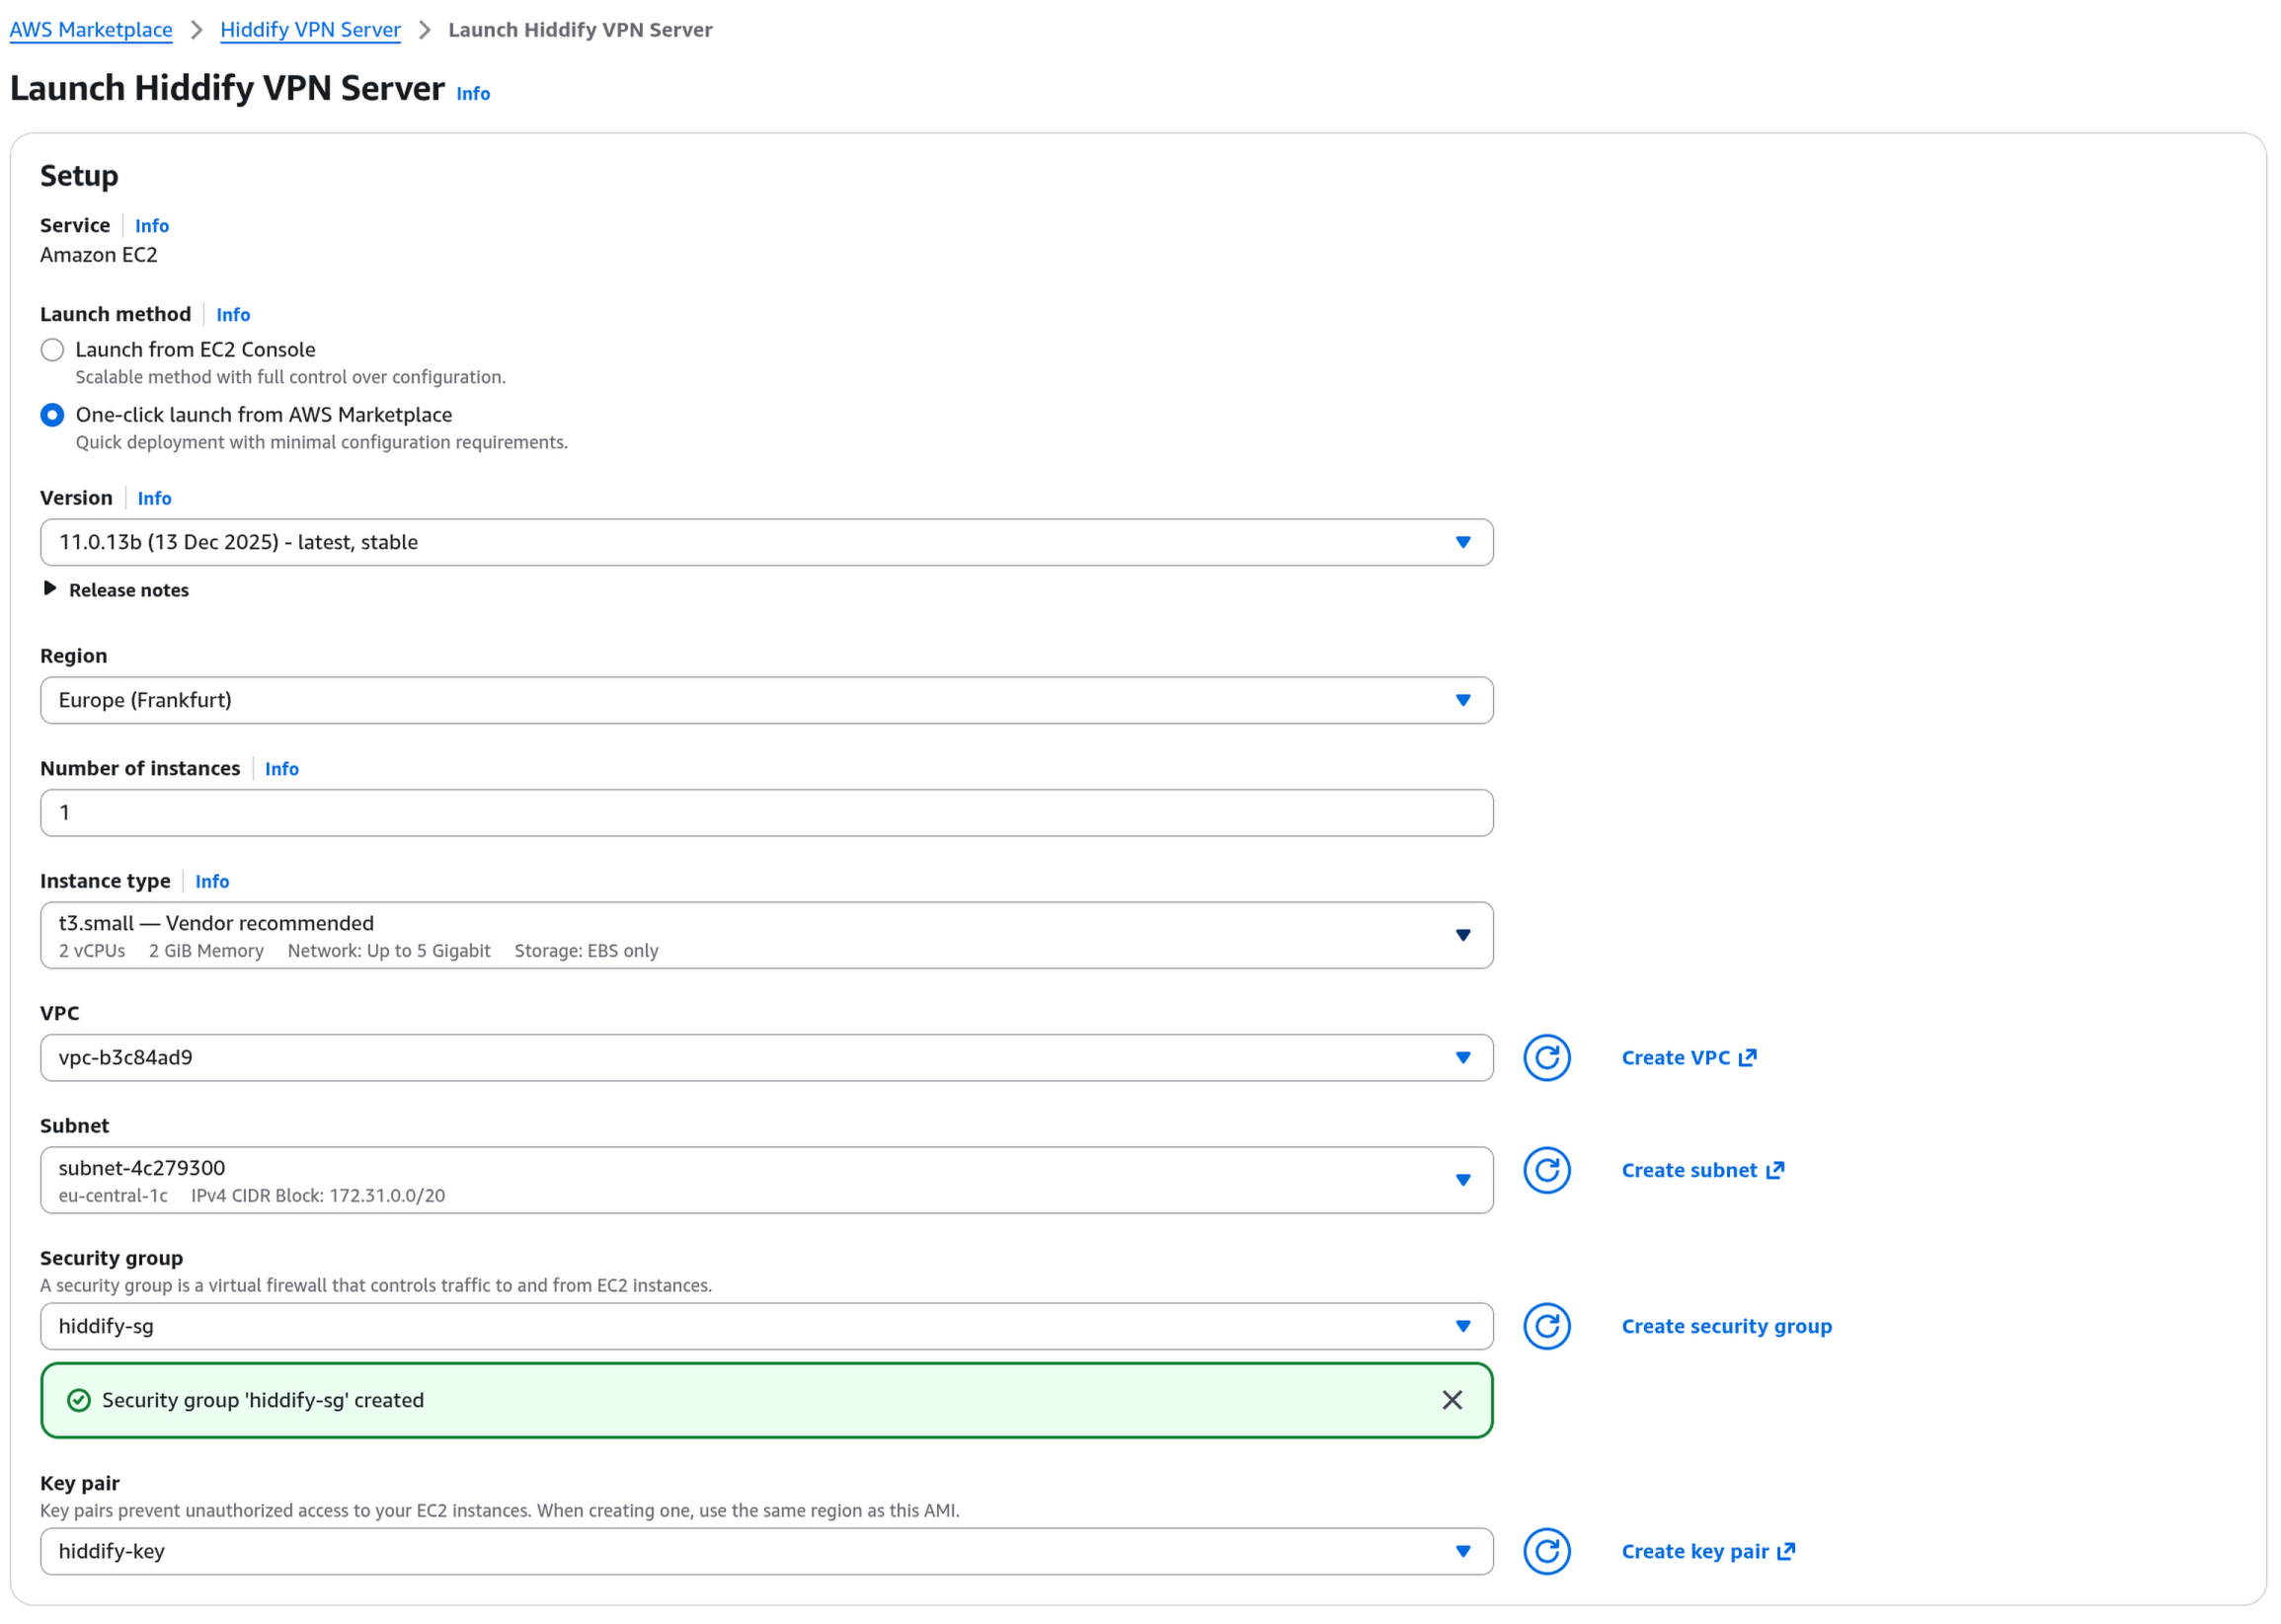
You're now on the "Launch Hiddify VPN Server" page. It has a lot of options, but most are already set correctly. Here's what to check and what to change:
- Launch method: Make sure "One-click launch from AWS Marketplace" is selected (it should be by default).
- Region: Should say Europe (Frankfurt). If not, click it and select
Europe (Frankfurt). This is the closest region to Iran.Alternatives if Frankfurt doesn't work:Europe (Ireland)orMiddle East (Bahrain) - Instance type: Should say t3.small (vendor recommended). Leave it as-is.
- VPC and Subnet: Leave the defaults. Don't change these.
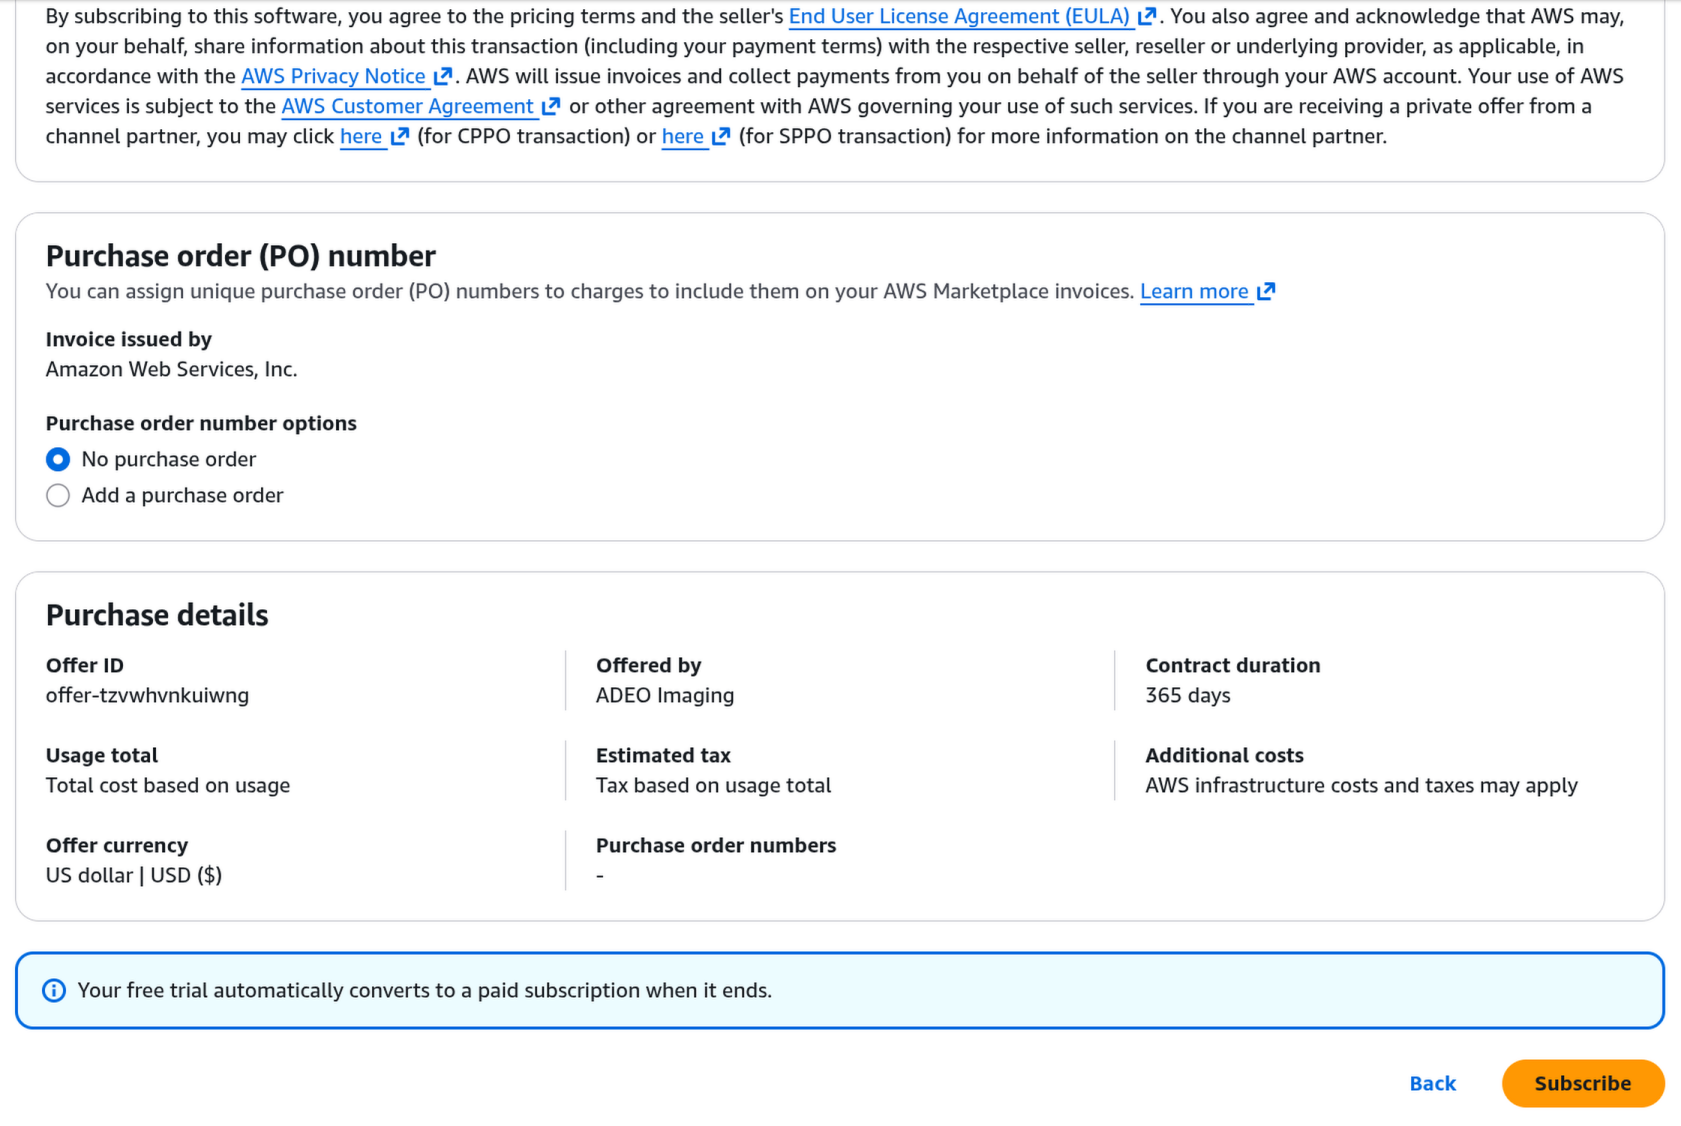
- Security group: Click "Create security group". A modal window will pop up with vendor-recommended firewall rules already filled in (SSH, HTTP, HTTPS, DNS, and other ports Hiddify needs). Enter a name like
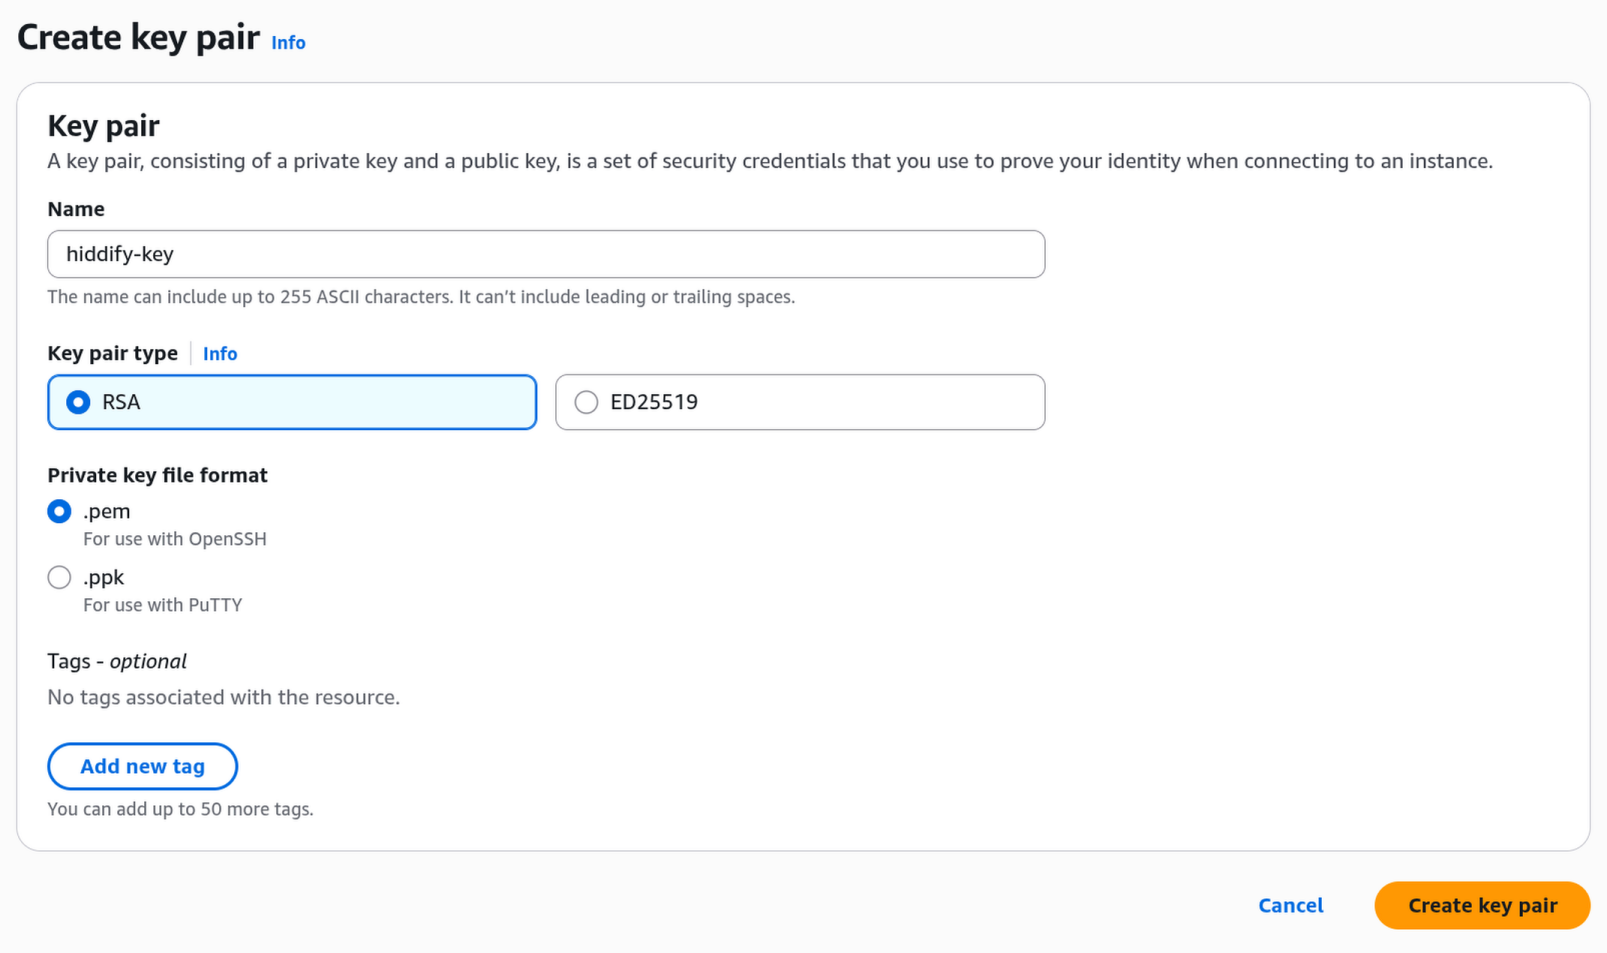
hiddify-sgand a description likeallow ssh, http, https, dns. Don't change any of the inbound rules. Click the orange "Create security group" button at the bottom. The modal will close and your new security group will be automatically selected. - Key pair: Click "Create key pair". This opens a new tab with the EC2 Key Pairs page. Click the orange "Create key pair" button in the top right. On the next page:
- Enter the name
hiddify-key - Leave RSA selected as the key pair type
- Leave .pem selected as the file format
- Ignore the Tags section
- Click the orange "Create key pair" button. A
.pemfile will automatically download. - Save this file somewhere safe.
- Enter the name
- Go back to the Marketplace tab. Click the refresh button (circular arrow) next to the key pair dropdown, then select hiddify-key.
- Your page should now look like this, with both hiddify-sg and hiddify-key selected:
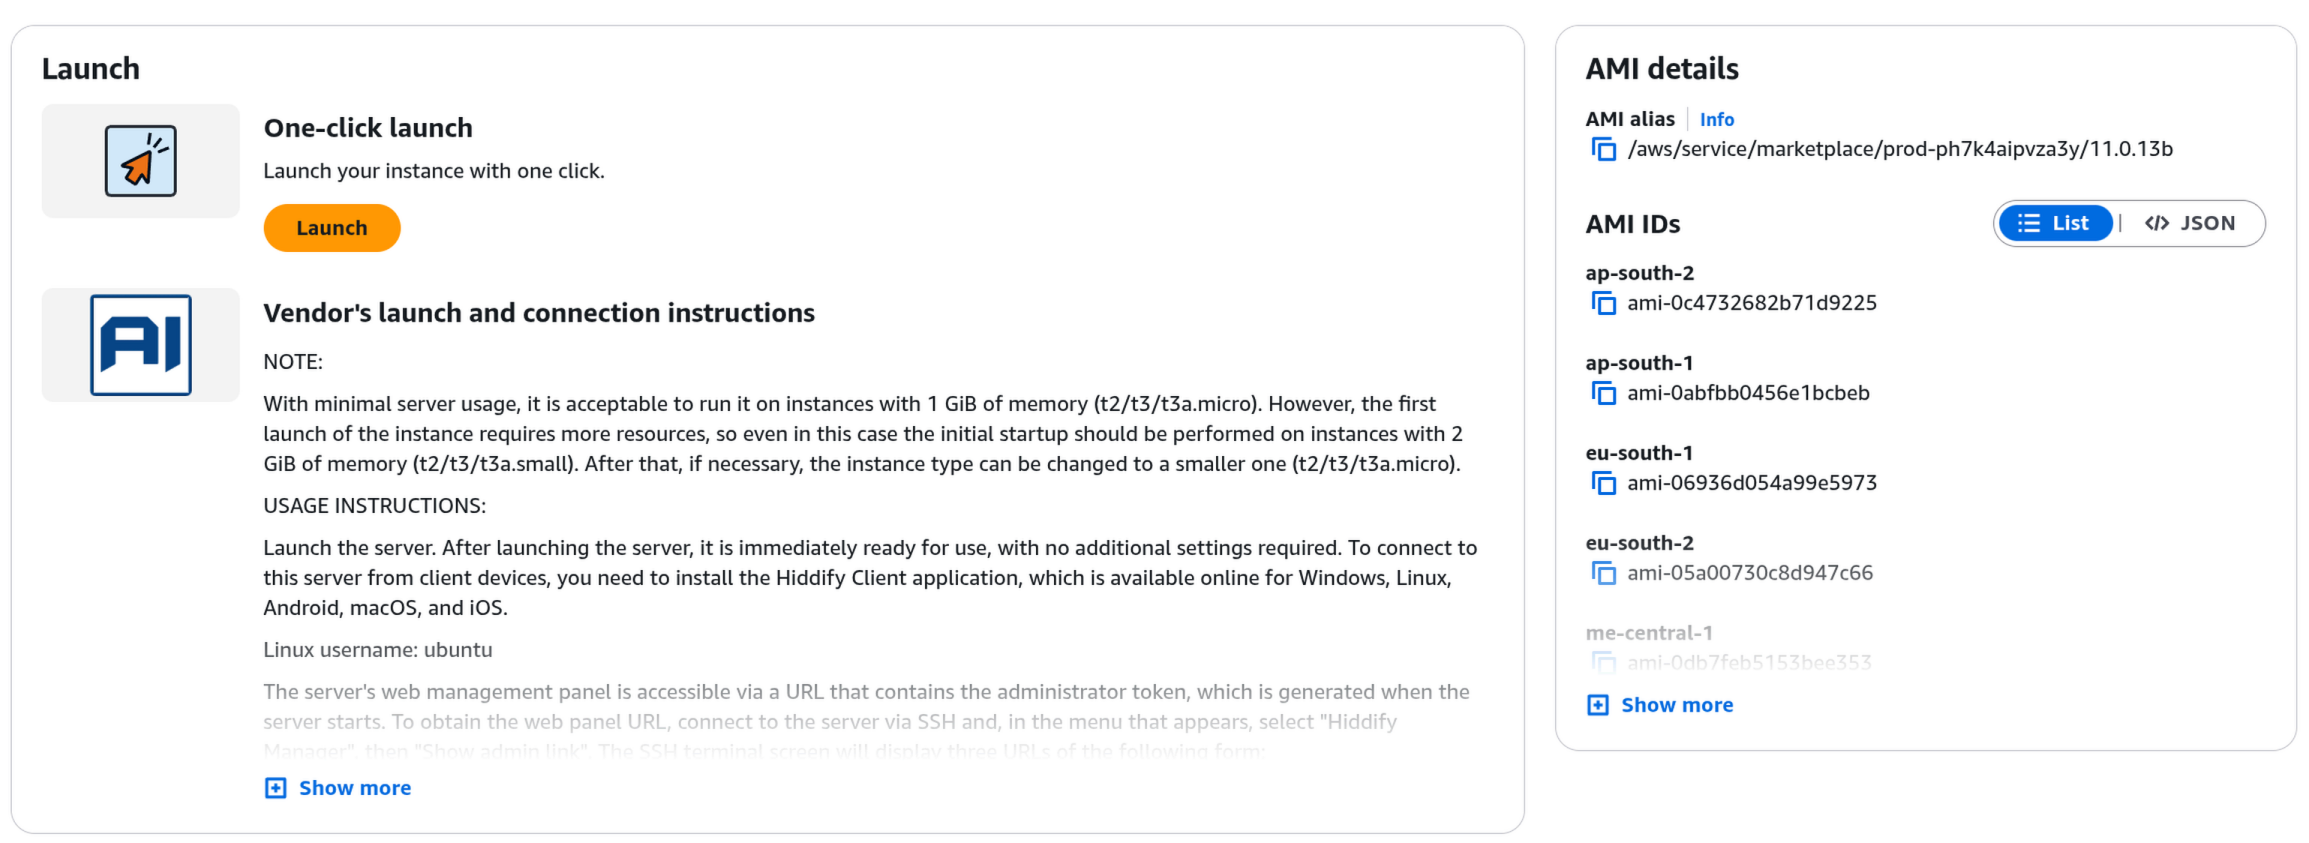
- Scroll down past the vendor instructions and AMI details (you can ignore all of that). Click the orange "Launch" button.
.pem file safe! If you lose it, you won't be able to SSH into your server. You probably won't need it, but it's good to have just in case.
اکنون در صفحه «Launch Hiddify VPN Server» هستید. این صفحه گزینههای زیادی دارد، اما بیشتر آنها از قبل درست تنظیم شدهاند. موارد زیر را بررسی و تغییر دهید:
- روش راهاندازی (Launch method): مطمئن شوید «One-click launch from AWS Marketplace» انتخاب شده باشد (بهطور پیشفرض انتخاب شده).
- منطقه (Region): باید Europe (Frankfurt) باشد. اگر نیست، روی آن کلیک کنید و
Europe (Frankfurt)را انتخاب کنید. این نزدیکترین منطقه به ایران است.
جایگزینها اگر فرانکفورت کار نکرد:Europe (Ireland)یاMiddle East (Bahrain) - نوع سرور (Instance type): باید t3.small باشد. تغییر ندهید.
- VPC و Subnet: مقادیر پیشفرض را رها کنید. تغییر ندهید.
- گروه امنیتی (Security group): روی «Create security group» کلیک کنید. یک پنجره باز میشود با قوانین فایروال از پیش تنظیمشده. یک نام مانند
hiddify-sgو توضیحی مانندallow ssh, http, https, dnsوارد کنید. قوانین ورودی را تغییر ندهید. روی دکمه نارنجی «Create security group» در پایین کلیک کنید. تصویر بالا را ببینید. - جفت کلید (Key pair): روی «Create key pair» کلیک کنید. یک تب جدید باز میشود. روی دکمه نارنجی «Create key pair» در بالا سمت راست کلیک کنید. در صفحه بعد:
- نام
hiddify-keyرا وارد کنید - RSA را بهعنوان نوع کلید انتخابشده بگذارید
- .pem را بهعنوان فرمت فایل انتخابشده بگذارید
- بخش Tags را نادیده بگیرید
- روی دکمه نارنجی «Create key pair» کلیک کنید. یک فایل
.pemبهطور خودکار دانلود میشود - این فایل را در جای امنی ذخیره کنید
- نام
- به تب Marketplace برگردید. روی دکمه بازخوانی (فلش دایرهای) کنار منوی کشویی key pair کلیک کنید، سپس hiddify-key را انتخاب کنید.
- صفحه شما اکنون باید مانند تصویر بالا باشد، با هر دوی hiddify-sg و hiddify-key انتخابشده.
- به پایین صفحه اسکرول کنید و از بخشهای vendor instructions و AMI details رد شوید (نیازی به خواندن آنها نیست). روی دکمه نارنجی «Launch» کلیک کنید. تصویر بالا را ببینید.
هشدار: فایل .pem را در جای امنی نگه دارید! اگر آن را گم کنید، نمیتوانید از طریق SSH به سرور متصل شوید. احتمالاً به آن نیاز نخواهید داشت، اما خوب است که داشته باشید.
Wait for Installation (~10 minutes)
After clicking Launch, you'll see a green success banner at the top of the page:

- Click "View instance on EC2" in the green banner. This takes you to the EC2 console where you can see your server.
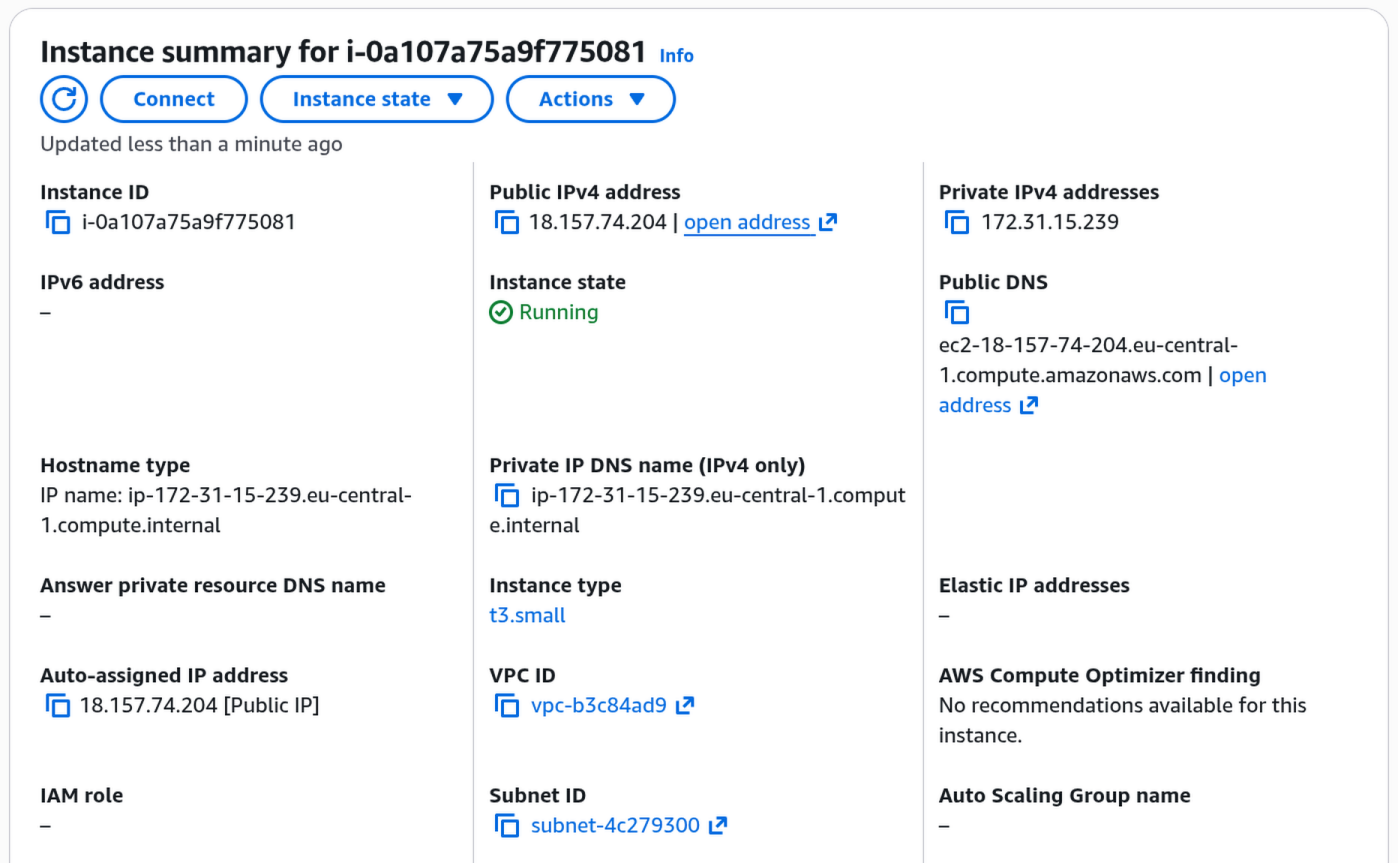
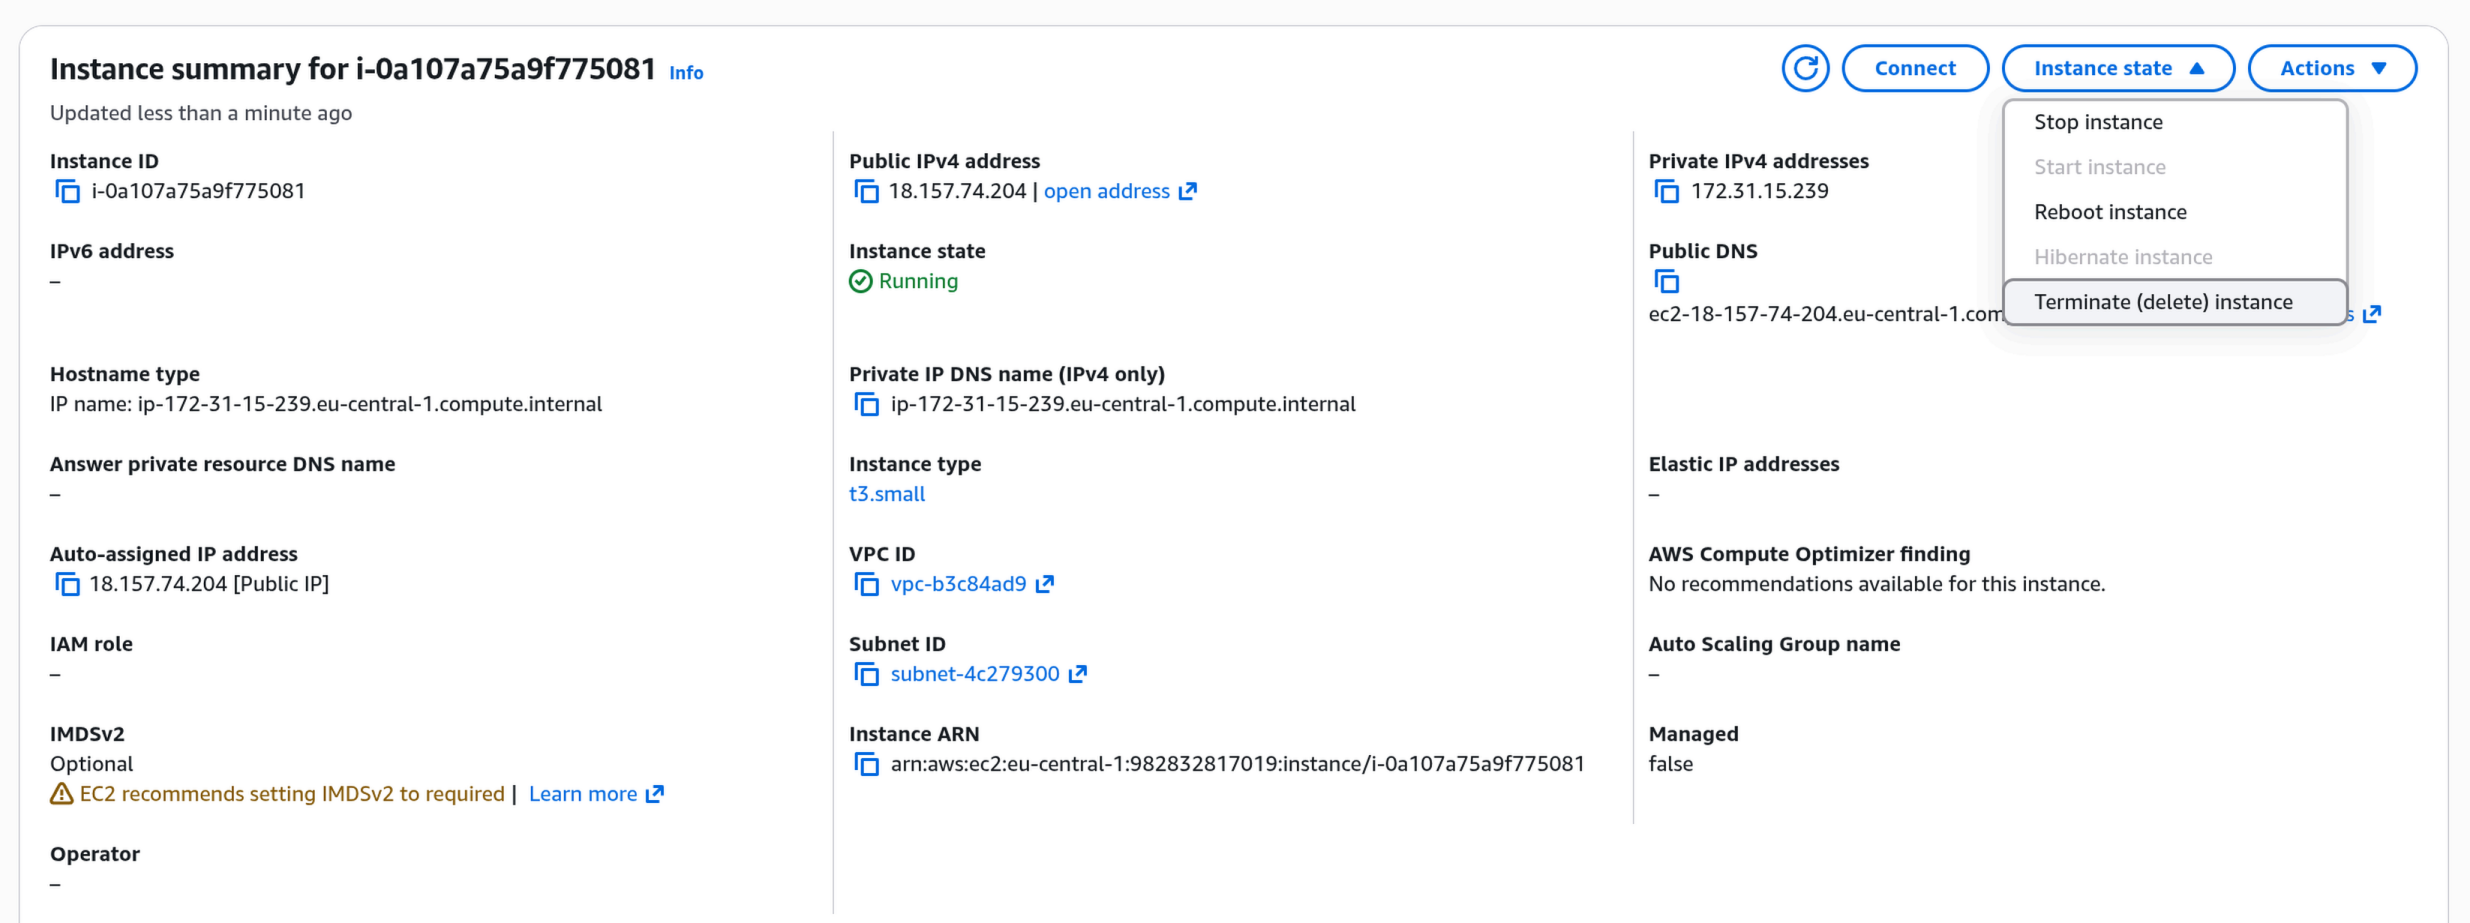
- You'll see the Instance summary page. This page has a lot of information, but you only need two things from it:
- Instance ID (top left, starts with
i-, for examplei-0a107a75a9f775081). Write this down. You'll use it as your admin password. - Public IPv4 address (top middle, for example
18.157.74.204). You can click the copy icon next to it, or click "open address" to go directly to your server.
- Instance ID (top left, starts with
بعد از کلیک روی Launch، یک بنر سبز موفقیت در بالای صفحه خواهید دید. تصویر بالا را ببینید.
- روی «View instance on EC2» در بنر سبز کلیک کنید. این شما را به کنسول EC2 میبرد تا سرور خود را ببینید.
- صفحه Instance summary را خواهید دید. این صفحه اطلاعات زیادی دارد، اما فقط به دو چیز نیاز دارید:
- Instance ID (بالا سمت چپ، شروع با
i-، مثلاًi-0a107a75a9f775081). این را یادداشت کنید؛ بهعنوان رمز عبور ادمین استفاده میشود. - Public IPv4 address (بالا وسط، مثلاً
18.157.74.204). میتوانید روی آیکون کپی کنار آن کلیک کنید، یا روی «open address» بزنید تا مستقیماً به سرور بروید.
- Instance ID (بالا سمت چپ، شروع با
تصویر بالا را ببینید تا محل Instance ID و Public IPv4 address را پیدا کنید.
نکته: حدود ۱۰ دقیقه صبر کنید قبل از اینکه به پنل مدیریت دسترسی پیدا کنید. Hiddify در پسزمینه در حال نصب است. اگر «Instance state» هنوز «Running» نشان نمیدهد، صبر کنید و دکمه بازخوانی را بزنید.
Get Your Admin Panel Link
Hiddify generates a unique, secret URL for your admin panel during installation. To get this URL, you need to connect to your server using a built-in browser terminal in AWS. No software to install, no commands to memorize.
Wait about 10 minutes after launching before doing this, so Hiddify has time to finish installing.
- Go back to the Instance summary page from Step 4 (the page showing your Instance ID and IP address).
- Click the "Connect" button near the top of the page (it's a blue outlined button next to "Instance state" and "Actions").
- You'll see the "Connect to instance" page. The "EC2 Instance Connect" tab should already be selected. The username should say ubuntu. Don't change anything.
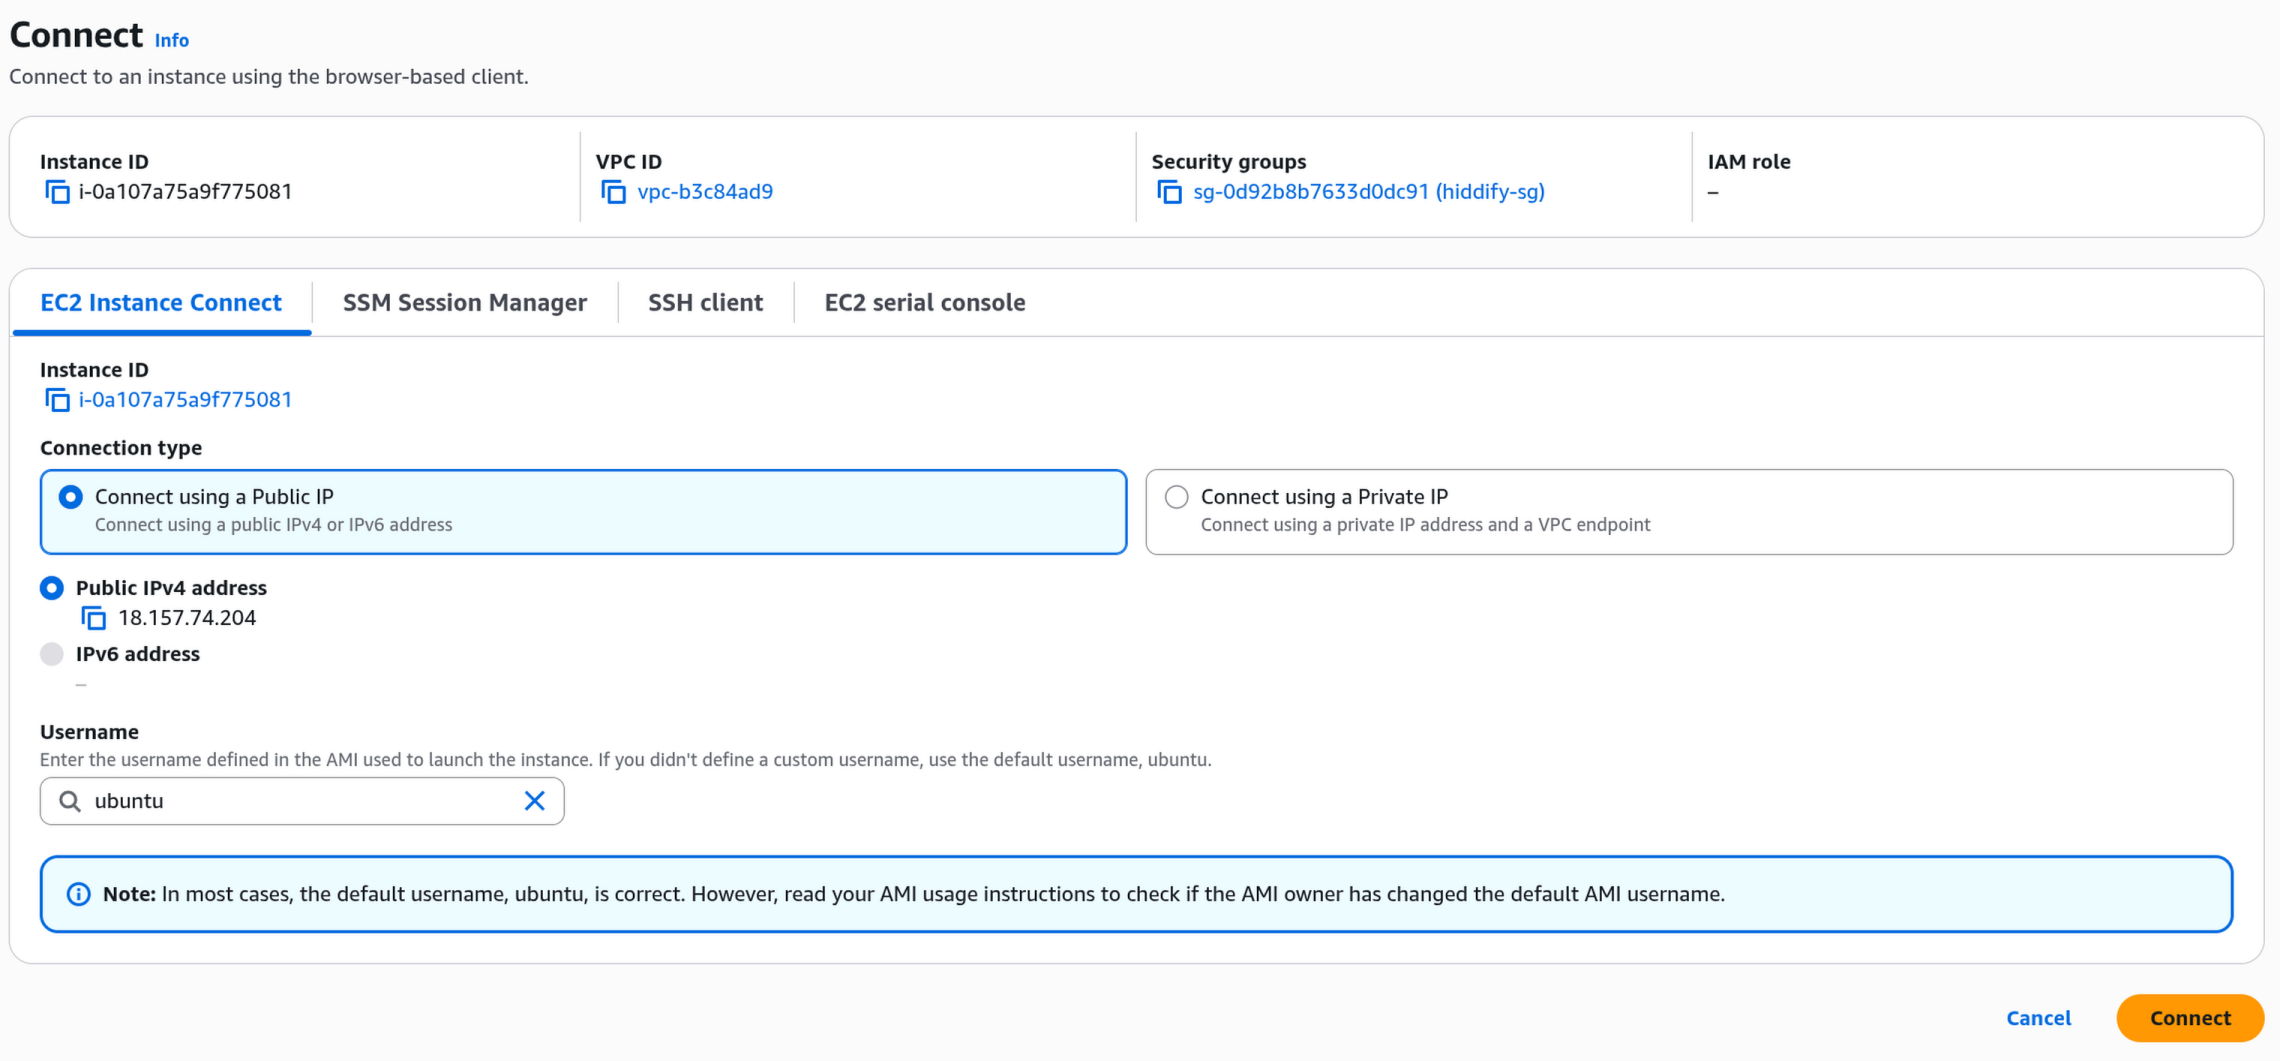
- Click the orange "Connect" button at the bottom right. A black terminal window will open in your browser.
- You'll see a lot of text scrolling by (system information, update notices, etc.). Ignore all of it. At the bottom, you'll see a menu that says:
MENU:
(1) Hiddify Manager
(2) Exit menu

Please select 1 or 2:
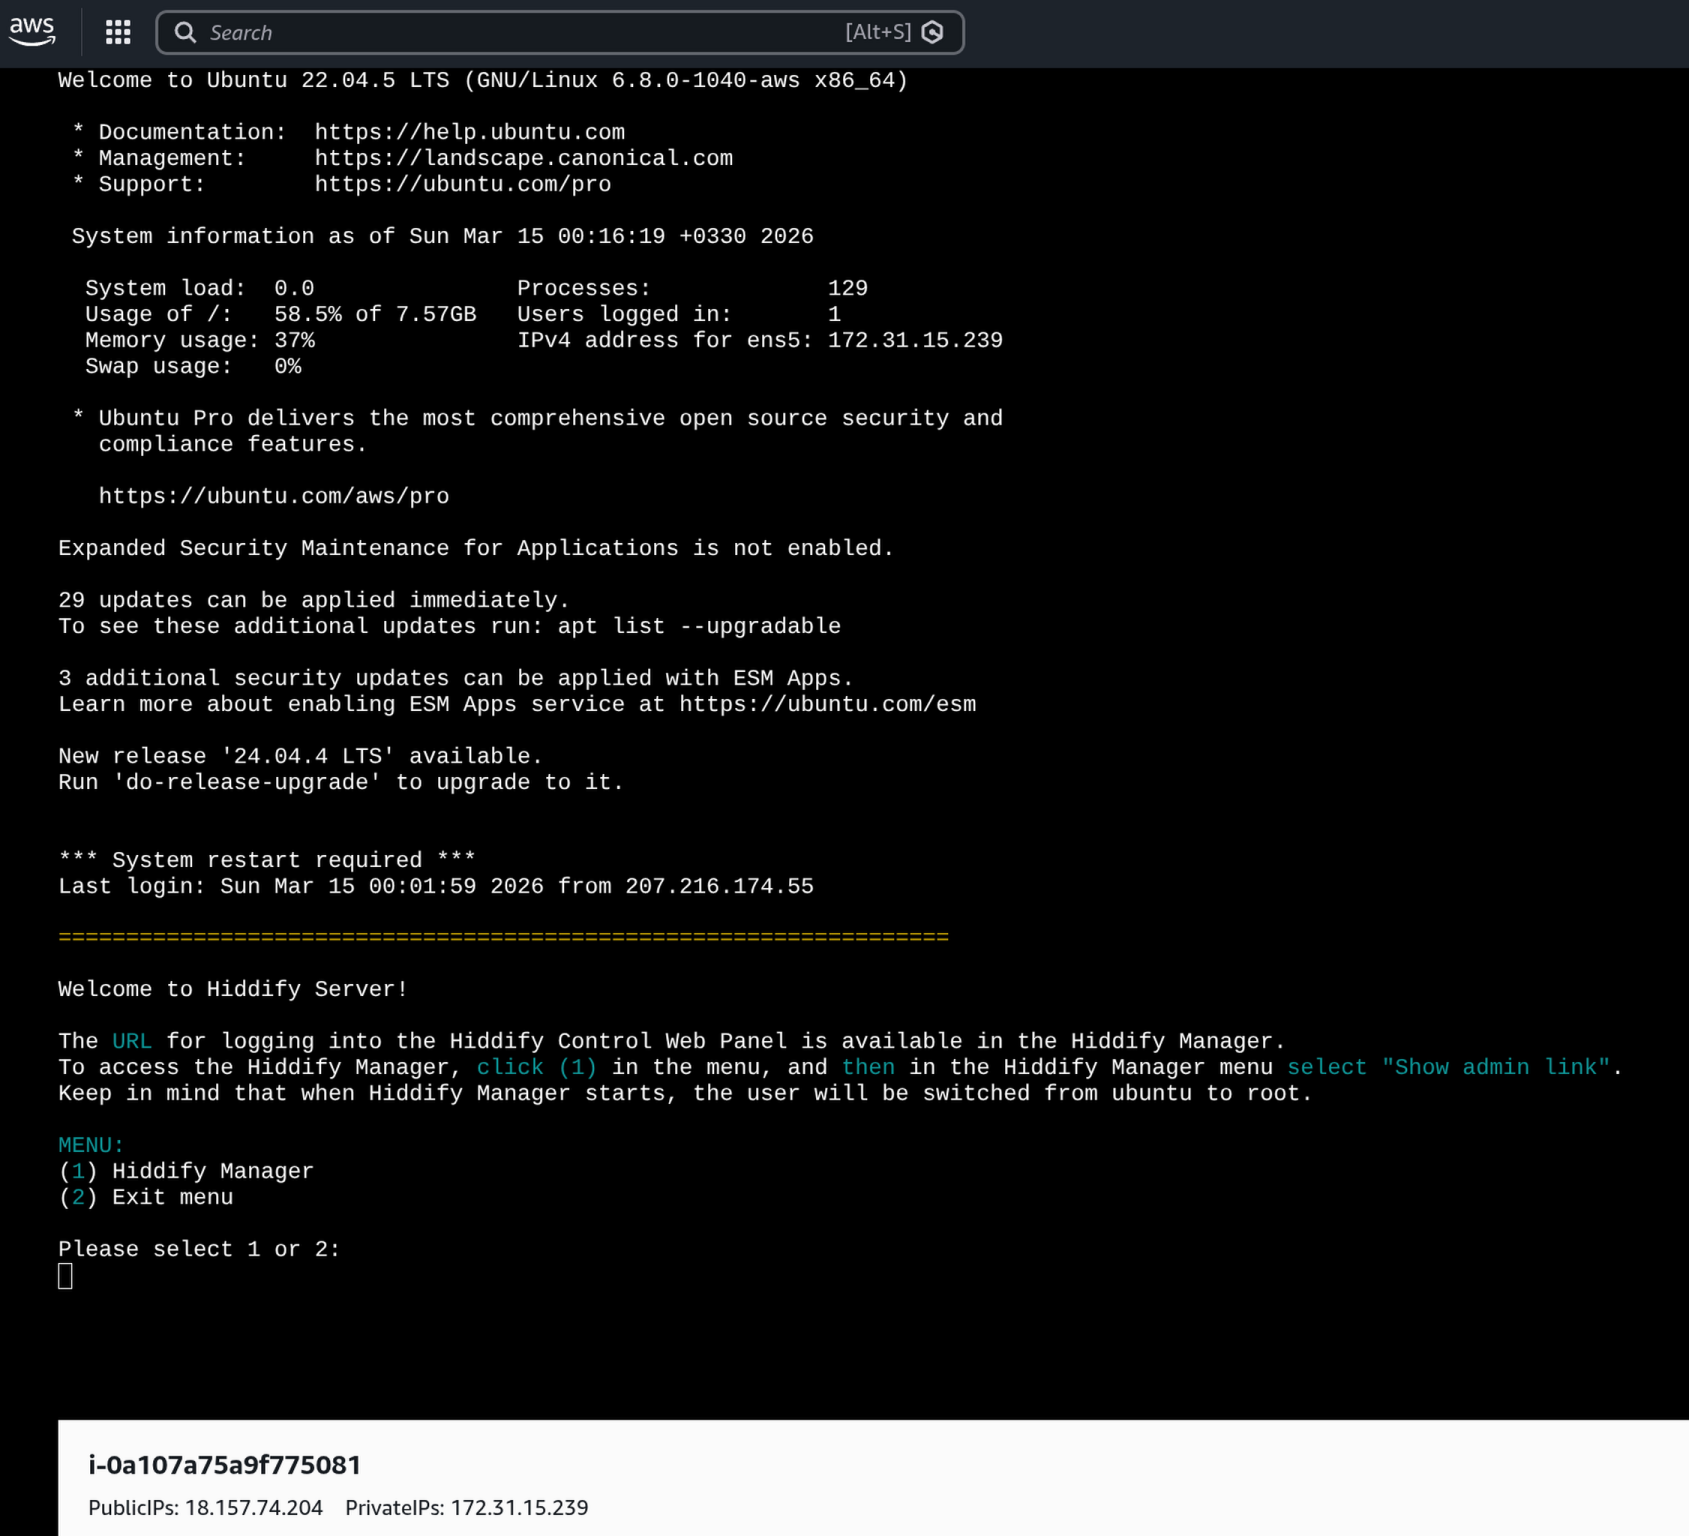
- Type 1 and press Enter. The Hiddify Manager will open.
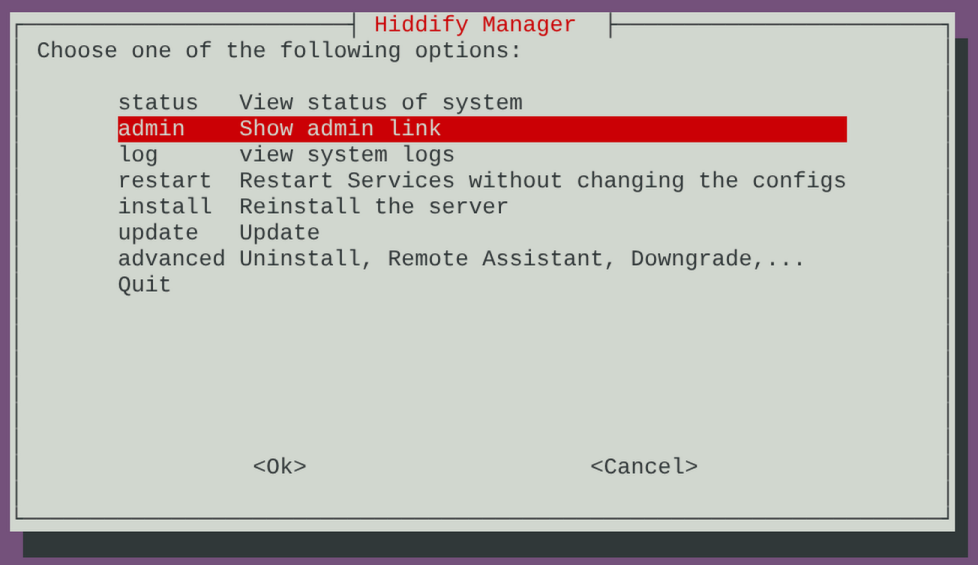
- You'll see a blue menu with several options. Use the down arrow key to scroll down to "admin Show admin link" so it's highlighted, then press Enter.
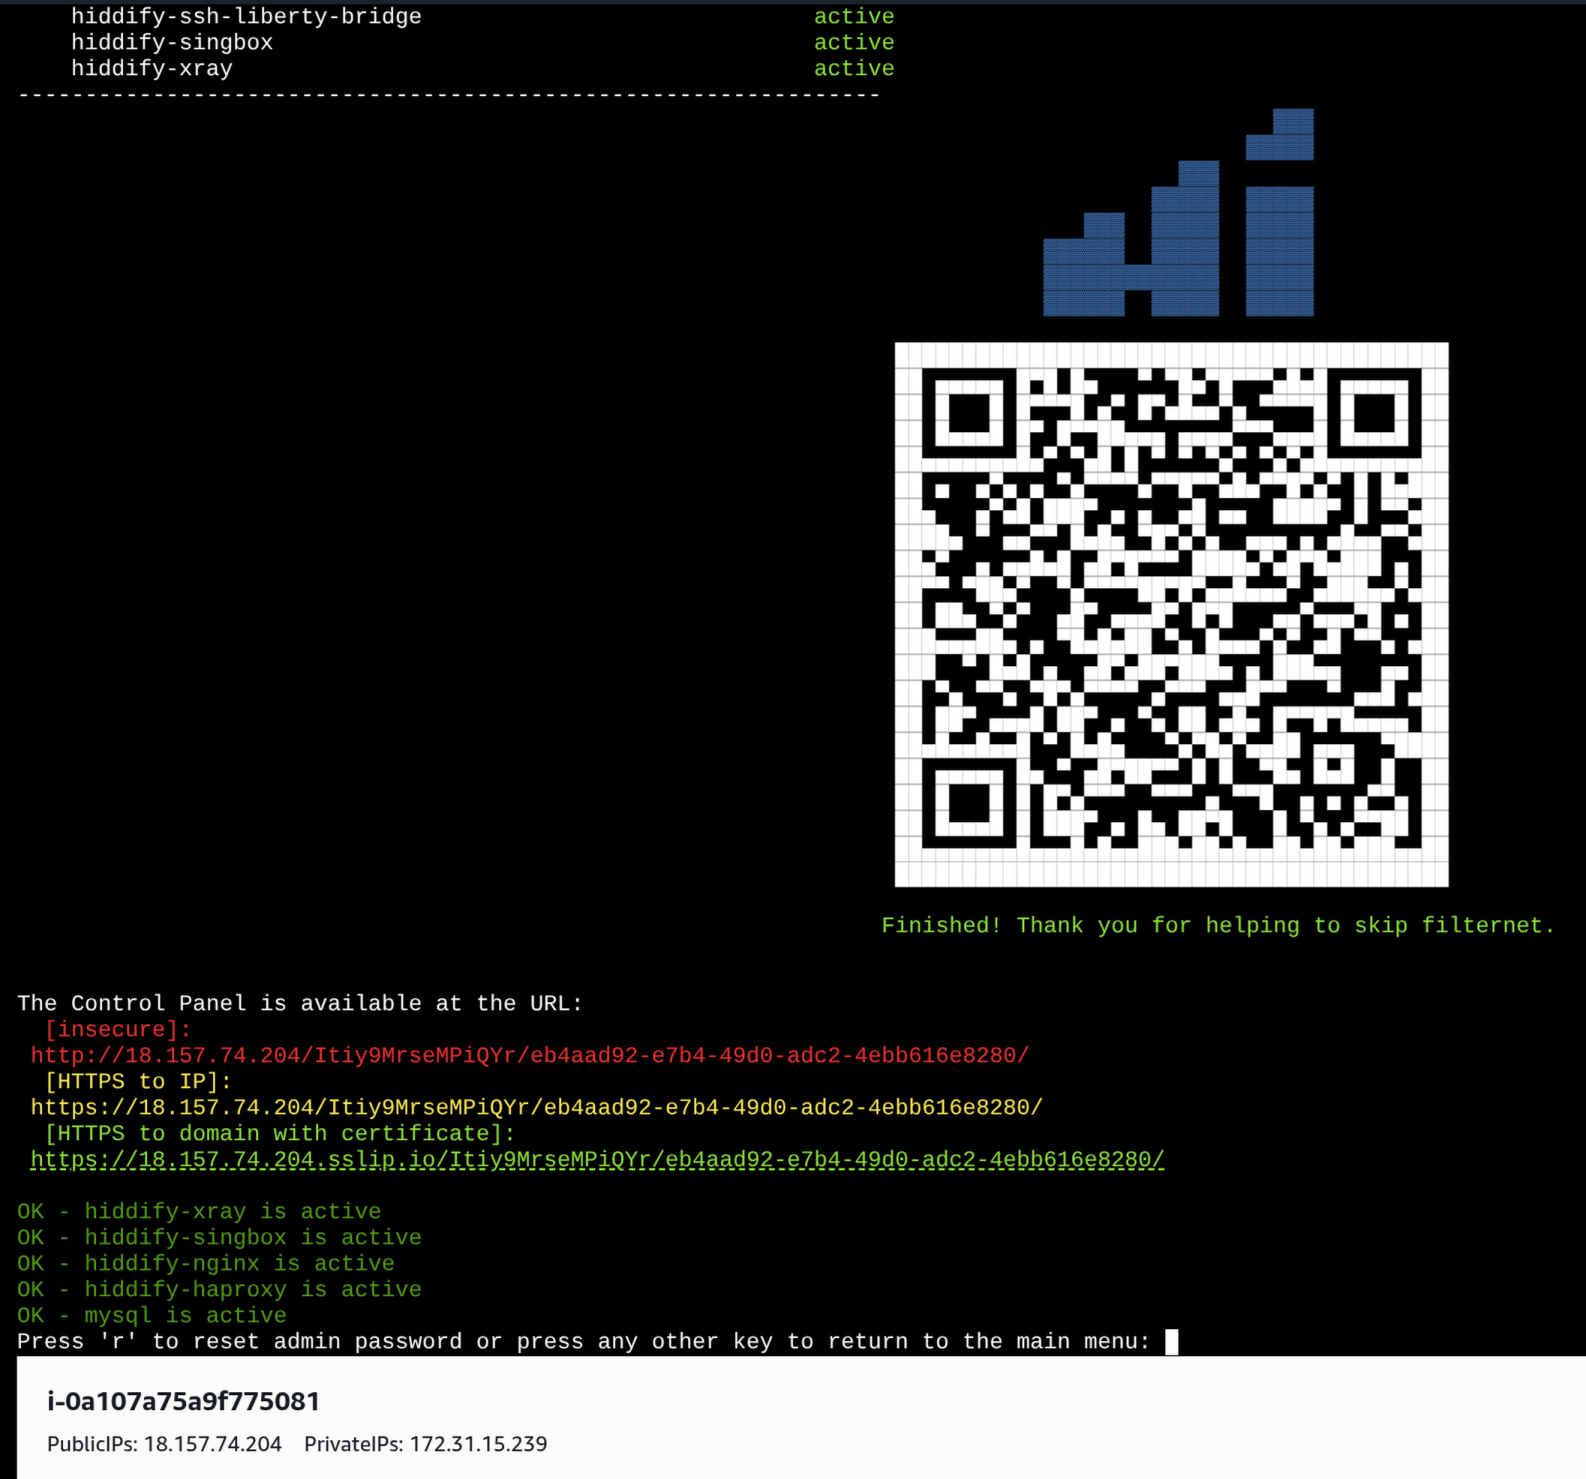
- After a moment, you'll see a QR code and three URLs. Look for the one labeled [HTTPS to domain with certificate]. It's the last one and looks like:
https://YOUR_IP.sslip.io/SECRET_TOKEN/UUID/ - Click this URL directly in the terminal (it should be clickable). Or copy it and paste it into a new browser tab. This is your admin panel.
- If asked for a password, enter your Instance ID (the one starting with
i-from Step 4).
If you see a "Your connection is not private" warning in your browser, click "Advanced" then "Proceed". This only happens if you used the raw IP URL instead of the sslip.io one.

You'll then see the HiddifyManager login page. It asks for two things:
- Secret Code (UUID): This should already be filled in from the URL. If it's empty, paste the long code from the end of your admin URL (the part that looks like
a1b2c3d4-e5f6-7890-abcd-1234567890ef). - Password: Enter your Instance ID from Step 4 (the one starting with
i-, for examplei-0a107a75a9f775081). - Click "Login".
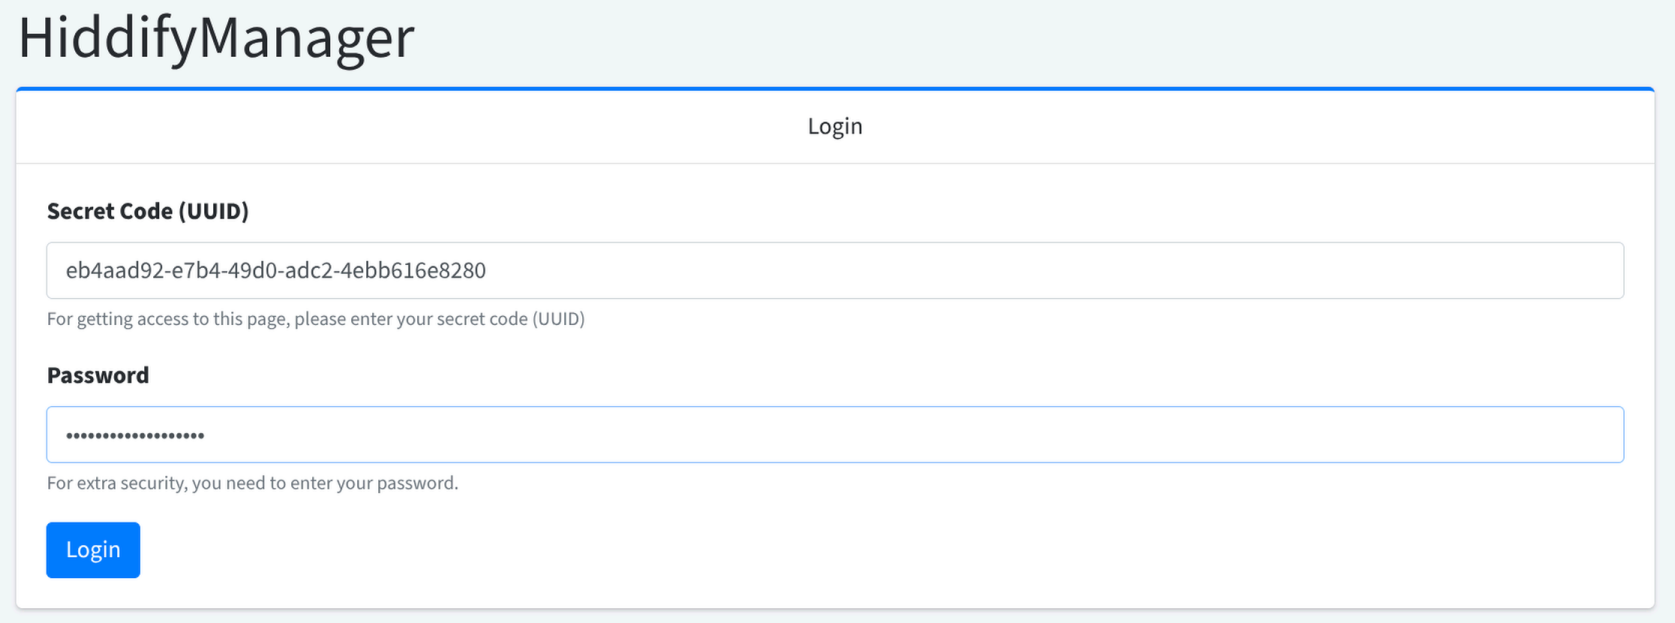
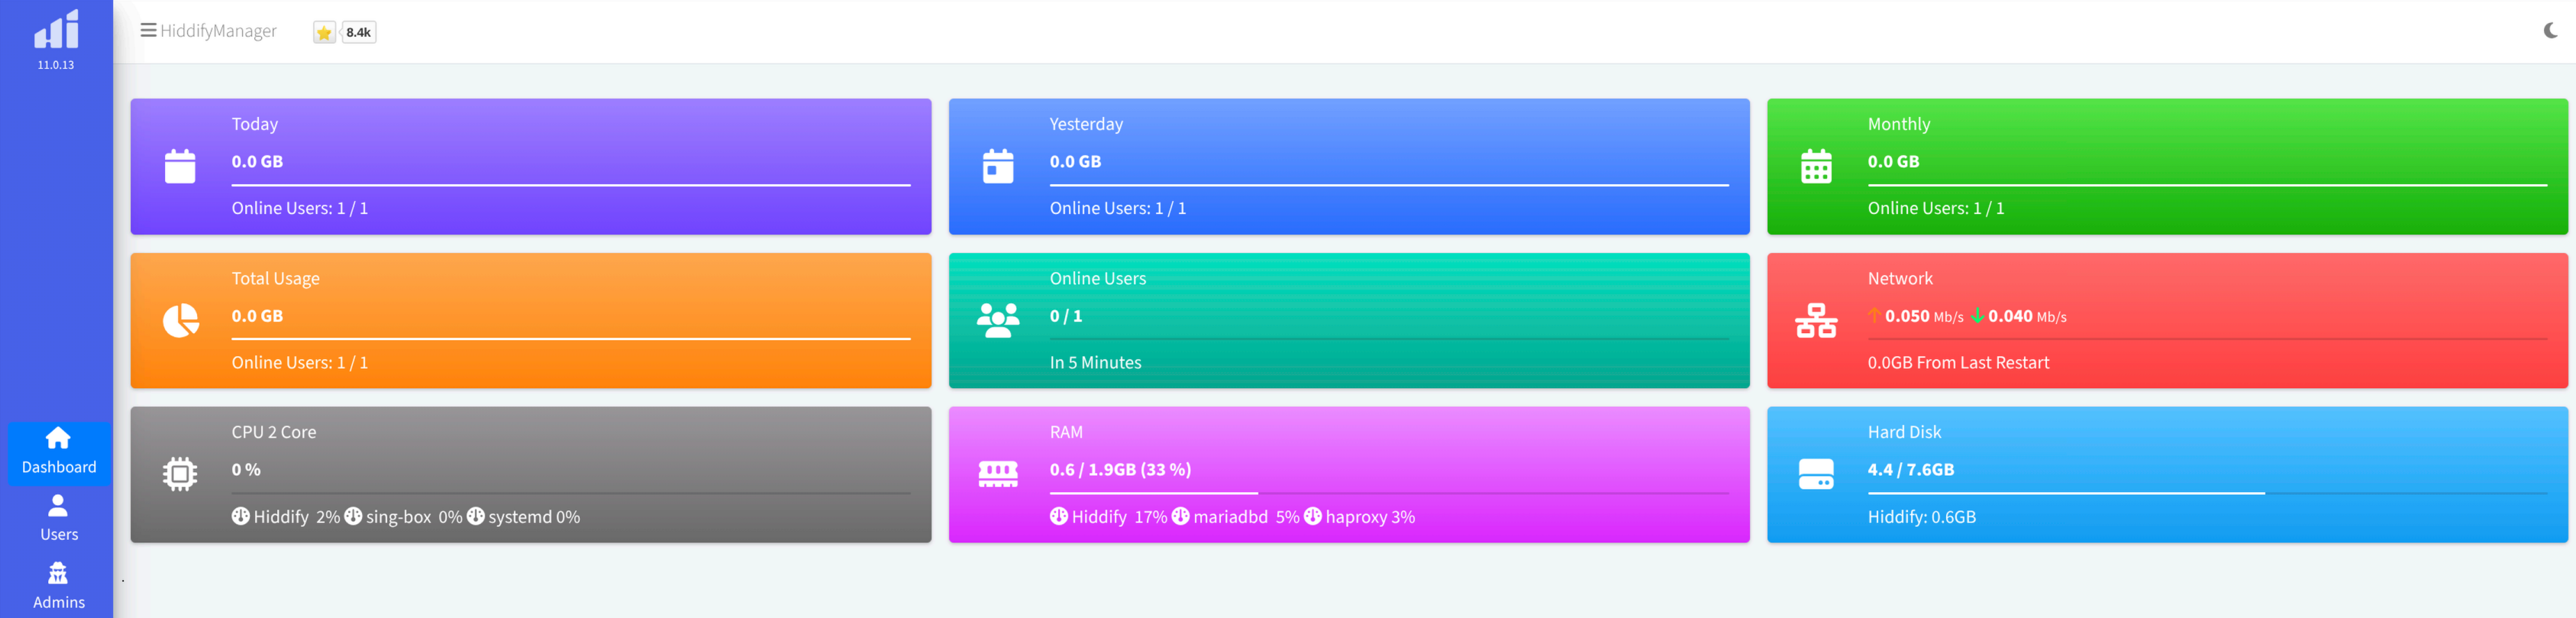
After logging in, you'll see the Hiddify dashboard. Congratulations, your VPN server is running!
Hiddify یک آدرس اختصاصی و مخفی برای پنل مدیریت شما تولید میکند. برای دریافت این آدرس باید از طریق ترمینال مرورگری AWS به سرور متصل شوید. نیازی به نصب نرمافزار یا حفظ کردن دستورات نیست.
حدود ۱۰ دقیقه بعد از راهاندازی صبر کنید تا Hiddify نصب شود.
- به صفحه Instance summary از مرحله ۴ برگردید (صفحهای که Instance ID و آدرس IP شما را نشان میدهد).
- روی دکمه «Connect» در بالای صفحه کلیک کنید (دکمه آبی کنار «Instance state» و «Actions»).
- صفحه «Connect to instance» باز میشود. تب «EC2 Instance Connect» باید از قبل انتخاب شده باشد. نام کاربری باید ubuntu باشد. چیزی را تغییر ندهید. تصویر بالا را ببینید.
- روی دکمه نارنجی «Connect» در پایین سمت راست کلیک کنید. یک پنجره ترمینال سیاه در مرورگرتان باز میشود.
- متنهای زیادی خواهید دید (اطلاعات سیستم و غیره). همه را نادیده بگیرید. در پایین، منویی خواهید دید با گزینههای (1) Hiddify Manager و (2) Exit menu. تصویر بالا را ببینید.
- عدد 1 را تایپ کنید و Enter بزنید. Hiddify Manager باز میشود.
- یک منوی آبی با چند گزینه خواهید دید. با کلید جهتی پایین به گزینه «admin Show admin link» بروید تا برجسته شود، سپس Enter بزنید. تصویر بالا را ببینید.
- بعد از لحظهای، یک کد QR و سه آدرس URL خواهید دید. آدرس کنار [HTTPS to domain with certificate] را پیدا کنید. این آخرین آدرس است و شبیه این است:
https://YOUR_IP.sslip.io/TOKEN/UUID/ - روی این آدرس مستقیماً در ترمینال کلیک کنید (باید قابل کلیک باشد). یا آن را کپی کنید و در یک تب جدید مرورگر پیست کنید. این پنل مدیریت شماست. تصویر بالا را ببینید.
- اگر رمز عبور خواست، Instance ID خود (از مرحله ۴) را وارد کنید.
اگر هشدار «Your connection is not private» دیدید، روی «Advanced» کلیک کنید، سپس «Proceed» را بزنید. این فقط وقتی اتفاق میافتد که از آدرس IP مستقیم استفاده کرده باشید.
سپس صفحه ورود HiddifyManager را خواهید دید. دو چیز میخواهد:
- Secret Code (UUID): باید از قبل از آدرس URL پر شده باشد. اگر خالی بود، کد بلند از انتهای آدرس ادمین خود را پیست کنید.
- Password: شناسه Instance ID خود از مرحله ۴ را وارد کنید (همان شناسهای که با
i-شروع میشود). - روی «Login» کلیک کنید.
بعد از ورود، داشبورد Hiddify را خواهید دید. تبریک! سرور VPN شما در حال اجراست!
آدرس پنل مدیریت خود را بوکمارک کنید. هر بار که بخواهید سرور را مدیریت کنید یا تنظیمات پروکسی جدید بسازید به آن نیاز دارید.
Quick Setup
The first time you log in, Hiddify shows a Quick Setup page. It may first ask you to set a password (enter anything you'll remember). Then you'll see this page:

- Domain: Enter your sslip.io address. Take your server's IP and replace the dots with dashes, then add
.sslip.io. For example, if your IP is203.0.113.42, enter203-0-113-42.sslip.io - CDN Domain: Leave this blank. It's only needed if you set up Cloudflare with a custom domain later.
- Block Domestic Sites: Leave this ON (blue toggle). It prevents your server from accessing Iranian domestic sites, which helps avoid detection.
- Decoy Site: Change the default to a real, boring website like
www.microsoft.comorwww.samsung.com. This is the fake site that shows up if someone visits your server's IP directly, making it look like a normal web server. - Click "Submit".
After clicking Submit, you'll see a second page with a long list of protocol checkboxes (WireGuard, SSH Proxy, Hysteria2, VLess, etc.). Leave all the defaults as-is and click "Submit" again. You don't need to change any of these.
Hiddify will now apply the settings. You'll see a progress bar and a warning to save your admin links. This takes a few minutes. After it finishes, you'll be taken to the dashboard.
اولین بار که وارد میشوید، Hiddify صفحه Quick Setup را نشان میدهد. موارد زیر را پر کنید:
- Domain: آدرس sslip.io خود را وارد کنید. IP سرور را بردارید، نقطهها را با خط تیره عوض کنید و
.sslip.ioاضافه کنید. مثلاً اگر IP شما203.0.113.42است، وارد کنید:203-0-113-42.sslip.io - CDN Domain: خالی بگذارید. فقط وقتی لازم است که بعداً Cloudflare با دامنه اختصاصی تنظیم کنید.
- Block Domestic Sites: روشن (آبی) بگذارید. از دسترسی سرور به سایتهای داخلی ایران جلوگیری میکند و کمک میکند شناسایی نشود.
- Decoy Site: مقدار پیشفرض را به یک سایت واقعی و عادی مثل
www.microsoft.comیاwww.samsung.comتغییر دهید. این سایتی است که اگر کسی مستقیماً IP سرور شما را باز کند نمایش داده میشود. - روی «Submit» کلیک کنید.
بعد از کلیک Submit، صفحه دومی با لیست بلندی از پروتکلها خواهید دید (WireGuard، SSH Proxy، Hysteria2، VLess و غیره). همه تنظیمات پیشفرض را بگذارید و دوباره «Submit» بزنید. نیازی به تغییر ندارید.
Hiddify تنظیمات را اعمال میکند. یک نوار پیشرفت و هشداری برای ذخیره لینکهای ادمین خواهید دید. چند دقیقه طول میکشد. بعد از اتمام به داشبورد منتقل میشوید.
نکته: اگر دامنه اختصاصی دارید و میخواهید مسیریابی CDN از طریق Cloudflare تنظیم کنید (مقاومترین روش در برابر سانسور)، بعداً از بخش Settings میتوانید این کار را انجام دهید.
Generate User Configs
Now let's get the connection details you'll share with people in Iran:
- In the admin panel, click "Users" in the sidebar.
- You'll see a table with a user called "default". In the "User Links" column, you'll see buttons for each of your domains. Click any of them.

- A popup will appear with a QR code and Copy / Open buttons. This is what you share with people in Iran.

You can either:
- Screenshot the QR code and send the image to your contact
- Click "Copy" to copy the subscription link, then paste and send it
- Click "Open" to open the user page with all connection details
حالا بیایید اطلاعات اتصالی که با افراد در ایران به اشتراک میگذارید را دریافت کنیم:
- در پنل مدیریت، به بخش «Users» در نوار کناری بروید.
- روی کاربر پیشفرض (default user) کلیک کنید.
- کدهای QR، لینکهای اشتراک (subscription links) و لینکهای تنظیمات (config links) را خواهید دید. تصویر بالا را ببینید.
نکته: لینک اشتراک (subscription link) بهترین گزینه است؛ زیرا اگر تنظیمات سرور تغییر کند، بهطور خودکار بهروزرسانی میشود.
Share with People in Iran
Send the QR code screenshot or subscription link to your contacts in Iran via any channel that's still accessible:
- WhatsApp: may work intermittently, but messages are encrypted
- Signal: if both of you have it, this is the safest option
- Phone call: read out the subscription link or tell them to expect a message
- In person: scan the QR code directly from your screen

اسکرینشات کد QR یا لینک اشتراک را از طریق هر کانالی که هنوز در دسترس است برای مخاطبان خود در ایران ارسال کنید:
- WhatsApp: ممکن است بهصورت متناوب کار کند، اما پیامها رمزگذاری شدهاند
- Signal: اگر هر دو نفر دارید، امنترین گزینه است
- تماس تلفنی: لینک اشتراک را بخوانید یا بگویید منتظر پیام باشند
- حضوری: کد QR را مستقیماً از صفحهنمایش خود اسکن کنند
هشدار: از پیامک (SMS) برای ارسال لینکهای پروکسی یا ابزار ضد سانسور استفاده نکنید. پیامک رمزگذاری نشده و توسط مقامات ایران به طور فعال تحت نظارت است.
تصویر بالا را ببینید.
نکته: به مخاطبان خود بگویید ابتدا اپلیکیشن Hiddify را نصب کنند (بخش اپلیکیشنهای کلاینت را در پایین ببینید)، سپس کد QR را اسکن کنند یا لینک اشتراک را وارد کنند.
Optimize Your Server for Iran
Your server works with the default settings, but these changes will make it more effective against Iran's censorship:
Enable Key Protocols
Go to Settings > Proxies (or the protocol page in Quick Setup). Make sure these are enabled:
- Reality: Makes your traffic look like a normal HTTPS visit to a legitimate website. Very effective against DPI. Enable this.
- Websocket: Required for CDN routing (VLESS+WebSocket through Cloudflare). Enable this.
- Hysteria2: Should already be on. Fast UDP-based protocol that works when TCP is throttled.
- VLess: Should already be on. The base protocol for Reality and CDN routing.
Leave everything else at the default. More protocols does not mean better. Each one adds configs to the user's app, and too many makes it confusing.
Set Up CDN Routing (Advanced, Optional)
If you have a custom domain, you can route proxy traffic through Cloudflare's CDN. This is the most censorship-resistant setup because Iran would have to block all of Cloudflare to stop it.
- Buy a cheap domain (any registrar, a
.xyzcosts ~$2/year) - Add it to Cloudflare (free plan)
- In Cloudflare DNS, create an A record: name
proxy, value = your server's IP, with the orange cloud (Proxied) ON - In Cloudflare SSL/TLS > Overview, set mode to Full (strict)
- In Hiddify, go to Settings > Domains, click Create
- Set Mode to CDN, Domain to
proxy.yourdomain.com, and click Save - Go to Actions > Apply Configs to apply the changes
After this, users' Hiddify apps will automatically include CDN-routed configs alongside the direct ones. If the direct IP gets blocked, the CDN configs still work.
Create Separate Users
Instead of sharing the default user's configs with everyone, create separate users for different people. This lets you:
- Track who's using how much bandwidth
- Revoke one person's access without affecting others
- Set usage limits if needed
Go to Users, click "Create", give the user a name, and save. Each user gets their own QR code and subscription link.
بهینهسازی سرور برای ایران
سرور شما با تنظیمات پیشفرض کار میکند، اما این تغییرات آن را در برابر سانسور ایران موثرتر میکند:
فعالسازی پروتکلهای کلیدی
به Settings > Proxies بروید و مطمئن شوید این موارد فعال هستند:
- Reality: ترافیک شما شبیه بازدید عادی HTTPS از یک سایت معتبر به نظر میرسد. در برابر DPI بسیار موثر است. این را فعال کنید.
- Websocket: برای مسیریابی CDN (VLESS+WebSocket از طریق Cloudflare) لازم است. این را فعال کنید.
- Hysteria2: باید از قبل فعال باشد. پروتکل سریع مبتنی بر UDP که وقتی TCP کند شده کار میکند.
- VLess: باید از قبل فعال باشد. پروتکل پایه برای Reality و CDN.
بقیه را به حالت پیشفرض بگذارید. پروتکل بیشتر به معنای بهتر نیست. هر کدام تنظیمات بیشتری به اپ کاربر اضافه میکند و ممکن است گیجکننده باشد.
راهاندازی مسیریابی CDN (پیشرفته، اختیاری)
اگر دامنه اختصاصی دارید، میتوانید ترافیک پروکسی را از طریق CDN کلودفلر عبور دهید. این مقاومترین روش در برابر سانسور است، چون ایران باید کل کلودفلر را مسدود کند تا جلوی آن را بگیرد.
- یک دامنه ارزان بخرید (یک
.xyzحدود ۲ دلار در سال) - آن را به Cloudflare اضافه کنید (پلن رایگان)
- در DNS کلودفلر، یک رکورد A بسازید: نام
proxy، مقدار = IP سرور، با ابر نارنجی (Proxied) روشن - در SSL/TLS > Overview کلودفلر، حالت را روی Full (strict) بگذارید
- در Hiddify به Settings > Domains بروید، روی Create کلیک کنید
- Mode را روی CDN بگذارید، Domain را
proxy.yourdomain.comوارد کنید، و Save بزنید - به Actions > Apply Configs بروید تا تغییرات اعمال شود
بعد از این، اپ Hiddify کاربران به طور خودکار تنظیمات CDN را کنار تنظیمات مستقیم نشان میدهد. اگر IP مستقیم مسدود شود، تنظیمات CDN همچنان کار میکنند.
ساختن کاربران جداگانه
به جای اشتراکگذاری تنظیمات کاربر پیشفرض با همه، برای هر نفر کاربر جداگانه بسازید. این امکان را میدهد:
- مصرف پهنای باند هر نفر را جداگانه ببینید
- در صورت نیاز دسترسی یک نفر را قطع کنید بدون تأثیر روی بقیه
- محدودیت مصرف تعیین کنید
به Users بروید، روی «Create» کلیک کنید، یک نام وارد کنید و ذخیره کنید. هر کاربر کد QR و لینک اشتراک مخصوص خود را دارد.
Frequently Asked Questions
What is Hiddify?
Hiddify is an open-source anti-censorship tool that makes it easy to set up a multi-protocol VPN server. It supports advanced protocols like VLESS+Reality, Hysteria2, and VLESS+WebSocket+CDN, all built to get past deep packet inspection (DPI) and other censorship techniques that authoritarian governments rely on.
It's developed by a community of Iranian developers and is free to use (the software itself is free; you only pay for the server hosting).
How does Iran's internet censorship work?
Iran uses multiple layers of censorship:
- Deep Packet Inspection (DPI): Analyzes internet traffic to detect and block VPN protocols
- SNI blocking: Blocks connections based on the server name in the TLS handshake
- IP blacklisting: Blocks known VPN and proxy server IP addresses
- DNS filtering: Redirects or blocks DNS queries for censored domains
- Bandwidth throttling: Slows down traffic that looks like it could be VPN traffic
- Complete shutdowns: From Feb 28 to May 26, 2026, a near-total 88-day internet blackout, the longest in modern history. It has ended, but the relevant ongoing threat is the heavy DPI/SNI filtering that came back with restoration, and the risk of another shutdown
Hiddify's protocols mimic normal HTTPS traffic, so censors have a very hard time spotting and blocking them.
Why AWS?
AWS is recommended because:
- It's one of the most reliable cloud providers with global infrastructure
- Hiddify is available as a one-click deployment on AWS Marketplace
- AWS IPs are less likely to be blocked than smaller hosting providers
- The free trial lets you test before committing
- You can easily switch regions if one gets blocked
That said, Hiddify works on any Linux server. If you prefer another provider (DigitalOcean, Hetzner, OVH, etc.), you can use the manual install method.
How much does it cost?
AWS Marketplace path (this tutorial):
- 5-day free trial
- After trial: ~$50/month software fee + ~$8–15/month server costs
Manual install (budget alternative):
- ~$8/month total (just the server cost, no software fee)
- Same Hiddify software, same features
- Requires running one command via SSH; see Budget Alternative
What if my server's IP gets blocked?
If Iran blocks your server's IP, you have several options:
- Use Cloudflare CDN: Route traffic through Cloudflare's network (VLESS+WebSocket+CDN). Cloudflare has too many IPs to block entirely
- Get a new IP: Stop and restart your EC2 instance to get a new public IP (or allocate an Elastic IP)
- Use Reality protocol: VLESS+Reality makes your traffic look like it's going to a legitimate website (e.g., google.com)
- Run multiple servers: Set up servers in different regions as backups
Hiddify handles all of these approaches, and your users' subscription links update automatically when you make changes.
How do I share configs securely?
The subscription link isn't secret the way a password is, but you should still be careful about how you share it:
- Share via end-to-end encrypted channels when possible (Signal, WhatsApp)
- Avoid posting configs publicly on social media; this makes them easy for censors to find and block
- Share only with people you trust
- Use Hiddify's user management to create separate configs for different people; this way you can revoke access if needed
Is this legal?
Setting up a VPN server from outside Iran is legal in most countries. You're not breaking any laws in the US, EU, or most other jurisdictions by hosting a proxy server.
Inside Iran, the legality of VPN use is a gray area. The government has banned unauthorized VPNs, but millions of Iranians use them daily. The risk, if any, falls on people connecting from inside Iran, not on server operators outside the country.
The goal here is to help people access information and communicate freely, a fundamental human right recognized by the UN.
What protocols does Hiddify support, and which work best?
Hiddify supports many protocols. Here are the most effective ones against Iran's censorship:
- VLESS + Reality: Best overall. Makes traffic look like normal HTTPS to popular websites. Very hard to detect.
- Hysteria2: UDP-based, great for speed. Works well when TCP is throttled.
- VLESS + WebSocket + CDN: Routes through Cloudflare. Virtually impossible to block without blocking all Cloudflare traffic.
Hiddify automatically configures multiple protocols. Users' apps will try them all and use whichever works best.
Can I use a custom domain?
Yes! Using a custom domain improves reliability and makes it easier to switch servers. In Hiddify's admin panel:
- Go to Settings → Domains
- Add your domain and point its DNS to your server's IP
- Hiddify will automatically get a free SSL certificate via Let's Encrypt
If you use Cloudflare for DNS, you can also turn on CDN proxying to make it even harder to block.
Where can I learn more?
سوالات متداول
Hiddify چیست؟
Hiddify یک ابزار ضد سانسور متنباز است که راهاندازی سرور VPN چند پروتکله را آسان میکند. از پروتکلهای پیشرفتهای مانند VLESS+Reality، Hysteria2 و VLESS+WebSocket+CDN پشتیبانی میکند که میتوانند فیلترینگ عمیق بستهها (DPI) را دور بزنند.
این نرمافزار توسط جامعهای از توسعهدهندگان ایرانی ساخته شده و استفاده از آن رایگان است؛ فقط هزینه هاستینگ سرور را پرداخت میکنید.
سانسور اینترنت ایران چگونه کار میکند؟
ایران از چندین لایه سانسور استفاده میکند:
- فیلترینگ عمیق بستهها (DPI): ترافیک اینترنت را تحلیل و پروتکلهای VPN را شناسایی و مسدود میکند
- مسدودسازی SNI: اتصالات را بر اساس نام سرور در TLS مسدود میکند
- لیست سیاه IP: آدرسهای IP شناختهشده VPN و پروکسی را مسدود میکند
- فیلترینگ DNS: درخواستهای DNS برای دامنههای سانسورشده را مسدود یا تغییر مسیر میدهد
- کاهش سرعت: ترافیکی که شبیه VPN باشد را کند میکند
- قطعی کامل: از ۹ اسفند ۱۴۰۴ تا ۵ خرداد ۱۴۰۵، قطعی تقریباً کامل اینترنت به مدت ۸۸ روز، طولانیترین در تاریخ معاصر. این قطعی پایان یافته، اما تهدید جاری مهم، فیلترینگ سنگین DPI/SNI است که با بازگشت اینترنت برقرار شد و نیز خطر قطعی دوباره
پروتکلهای Hiddify ترافیک را شبیه HTTPS عادی نشان میدهند، به همین دلیل شناسایی و مسدودسازی آنها بسیار سخت است.
هزینه چقدر است؟
روش مارکتپلیس AWS (این آموزش):
- ۵ روز آزمایشی رایگان
- بعد از دوره آزمایشی: حدود ۵۰ دلار/ماه هزینه نرمافزار + ۸ تا ۱۵ دلار/ماه هزینه سرور
نصب دستی (روش ارزان):
- حدود ۸ دلار در ماه (فقط هزینه سرور، بدون هزینه نرمافزار)
- همان نرمافزار Hiddify، همان امکانات
- نیاز به اجرای یک دستور از طریق SSH
اگر IP سرور مسدود شد چه کنم؟
- استفاده از CDN کلودفلر: ترافیک را از طریق شبکه کلودفلر عبور دهید. مسدود کردن تمام IPهای کلودفلر عملاً غیرممکن است
- گرفتن IP جدید: سرور EC2 را متوقف و دوباره راهاندازی کنید تا IP جدید بگیرید
- استفاده از پروتکل Reality: ترافیک شما شبیه بازدید از یک سایت معتبر (مثل google.com) به نظر میرسد
- راهاندازی چند سرور: سرورها در مناطق مختلف به عنوان پشتیبان
لینکهای اشتراک کاربران به طور خودکار وقتی تغییراتی اعمال کنید بهروزرسانی میشوند.
کدام پروتکلها بهتر کار میکنند؟
- VLESS + Reality: بهترین گزینه کلی. ترافیک شبیه HTTPS عادی به نظر میرسد. شناسایی آن بسیار سخت است.
- Hysteria2: مبتنی بر UDP، سرعت بالا. وقتی TCP کند شده عالی کار میکند.
- VLESS + WebSocket + CDN: از طریق کلودفلر عبور میکند. بدون مسدود کردن کل کلودفلر قابل مسدود شدن نیست.
Hiddify به طور خودکار چندین پروتکل را تنظیم میکند. اپلیکیشن کاربران همه را امتحان میکند و بهترین را استفاده میکند.
آیا این کار قانونی است؟
راهاندازی سرور VPN از خارج ایران در بیشتر کشورها قانونی است. شما با میزبانی یک سرور پروکسی هیچ قانونی را در آمریکا، اتحادیه اروپا یا اکثر کشورهای دیگر نقض نمیکنید.
هدف این ابزار کمک به مردم در دسترسی به اطلاعات و برقراری ارتباط آزاد است؛ حقی بنیادین که سازمان ملل آن را به رسمیت شناخته است.
Budget Alternative: Free Manual Install
The AWS Marketplace method above includes a ~$50/month software fee. If you want to save money, you can install Hiddify manually on a plain Ubuntu server for just ~$8/month total.
Steps
-
Launch a plain Ubuntu server on AWS (or any provider):
- Go to EC2 → Launch Instance
- Choose Ubuntu Server 24.04 LTS
- Instance type:
t3.small(~$15/month). The initial Hiddify install needs 2 GB RAM and will hang on a t3.micro (1 GB). You can downgrade to t3.micro after installation finishes to save money. - Create or select a key pair
- In the Firewall (security groups) section, check all three boxes: Allow SSH, Allow HTTPS, and Allow HTTP. Then click "Edit" in the top right of the Network settings box and add these additional rules by clicking "Add security group rule" for each one:
- Type: DNS (TCP), Source: Anywhere
- Type: Custom TCP, Port range: 10000-65535, Source: Anywhere
- Type: All UDP, Source: Anywhere
- Leave storage at the default 8 GiB. This is plenty for Hiddify.
- Click "Launch instance"
-
SSH into your server:
ssh -i your-key.pem ubuntu@YOUR_SERVER_IP -
Update the system first (this prevents the Hiddify installer from getting stuck):
This will take a few minutes. Wait for it to finish completely.
sudo apt update && sudo apt upgrade -y -
Run the Hiddify installer:
curl -o /tmp/hiddify-install.sh https://i.hiddify.com/release && sudo bash /tmp/hiddify-install.sh - Wait about 10 minutes for the installation to complete.
- Get the admin panel link the same way as Step 5 above: go to the EC2 Instance summary, click "Connect", open EC2 Instance Connect, type 1 for Hiddify Manager, select "admin", and copy the sslip.io URL. The process is identical.
From here, everything is the same: generate configs, share QR codes, and help people connect. The only difference is no Marketplace software fee.
روش جایگزین ارزان: نصب دستی رایگان
روش مارکتپلیس AWS حدود ۵۰ دلار در ماه هزینه نرمافزار دارد. اگر میخواهید صرفهجویی کنید، میتوانید Hiddify را به صورت دستی روی یک سرور Ubuntu نصب کنید، فقط حدود ۸ دلار در ماه.
Ubuntu Server 24.04 LTS با نوع t3.small (~۱۵ دلار/ماه). نصب اولیه Hiddify به ۲ گیگابایت رم نیاز دارد و روی t3.micro (۱ گیگابایت) گیر میکند. بعد از نصب میتوانید به t3.micro تغییر دهید تا هزینه کمتر شود.
ssh -i your-key.pem ubuntu@YOUR_SERVER_IP
sudo apt update && sudo apt upgrade -y
چند دقیقه صبر کنید تا کامل تمام شود.
curl -o /tmp/hiddify-install.sh https://i.hiddify.com/release && sudo bash /tmp/hiddify-install.sh
سپس لینک پنل مدیریت را دریافت کنید: به صفحه Instance summary بروید، روی «Connect» کلیک کنید، EC2 Instance Connect را باز کنید، عدد ۱ را تایپ کنید، «admin» را انتخاب کنید، و آدرس sslip.io را کپی کنید. روش دقیقاً مانند مرحله ۵ بالا است.
این روش نیاز به دانش اولیه SSH دارد. اگر تا به حال از ترمینال استفاده نکردهاید، از روش مارکتپلیس بالا استفاده کنید.
How to Delete Your Server
If you no longer need your server, or if you want to stop being charged, you should terminate (delete) your EC2 instance. This permanently removes the server and stops all charges.
- Go to the EC2 Instances page in your AWS console.
- Find your Hiddify instance in the list and click on it to open the Instance summary.
- Click the "Instance state" dropdown button near the top right of the page.
- Select "Terminate (delete) instance" from the dropdown menu.
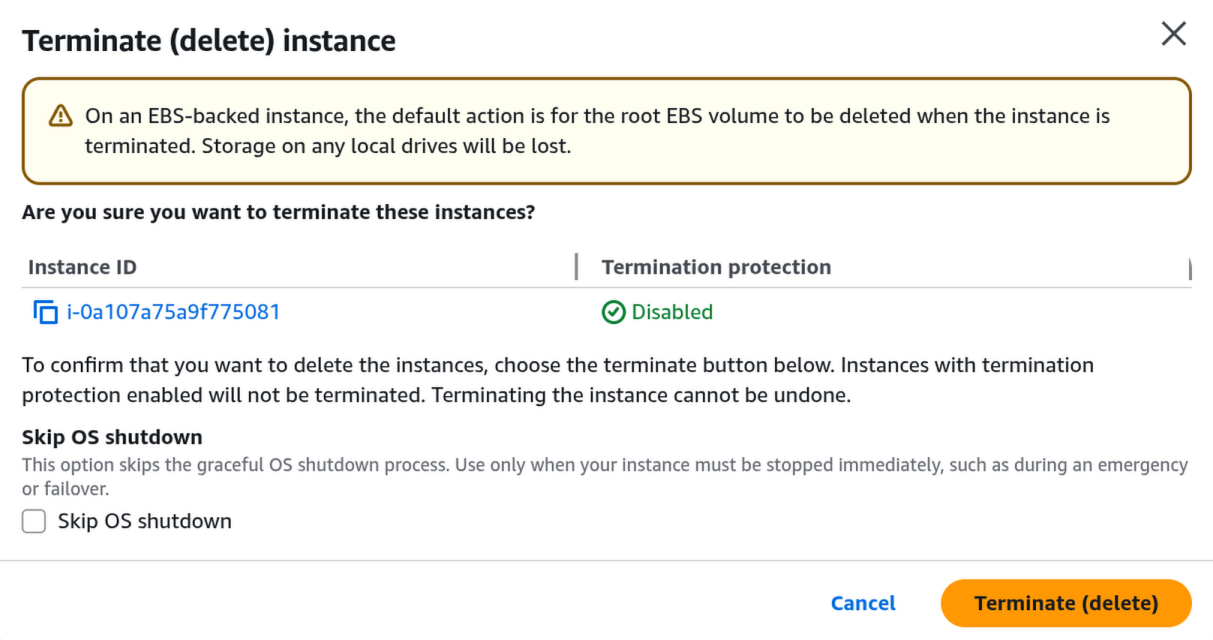
- A confirmation dialog will appear. Leave "Skip OS shutdown" unchecked.
- Click the orange "Terminate (delete)" button to confirm.
Cancel Your Marketplace Subscription
After terminating the instance, you should also cancel the Hiddify Marketplace subscription. Otherwise AWS may continue charging the software fee.
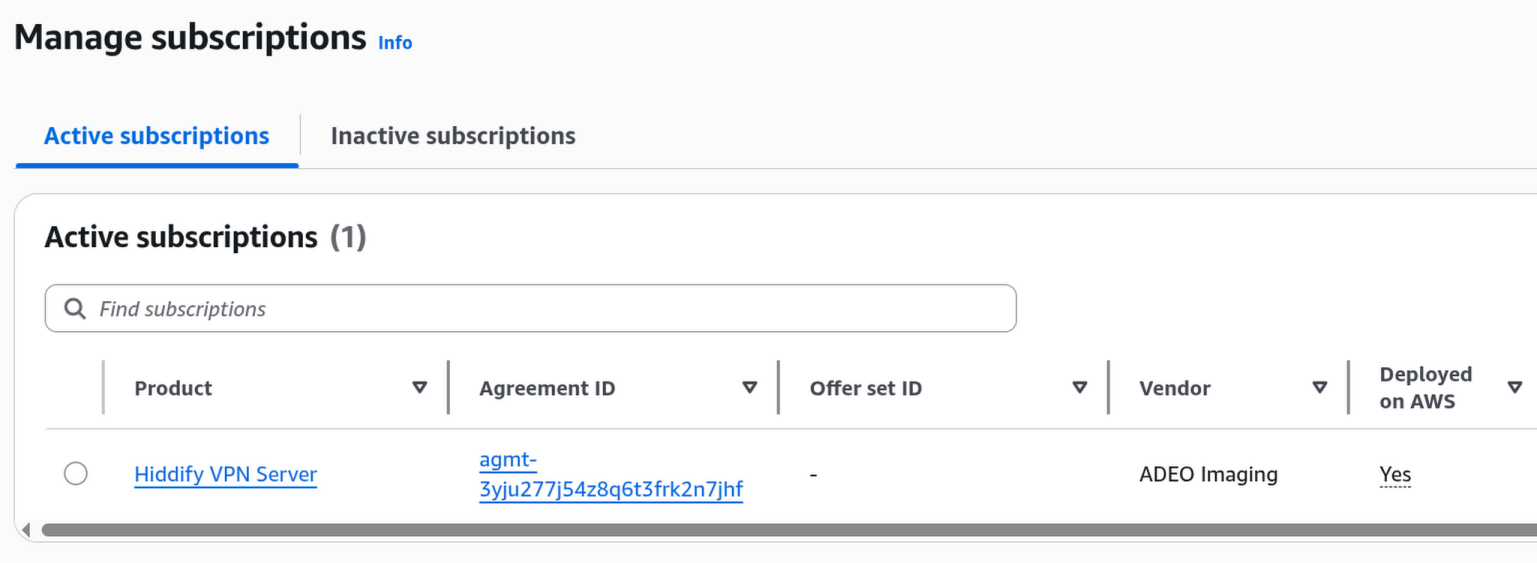
- Go to AWS Marketplace Subscriptions.
- You'll see "Hiddify VPN Server" listed under Active subscriptions. Click on it.
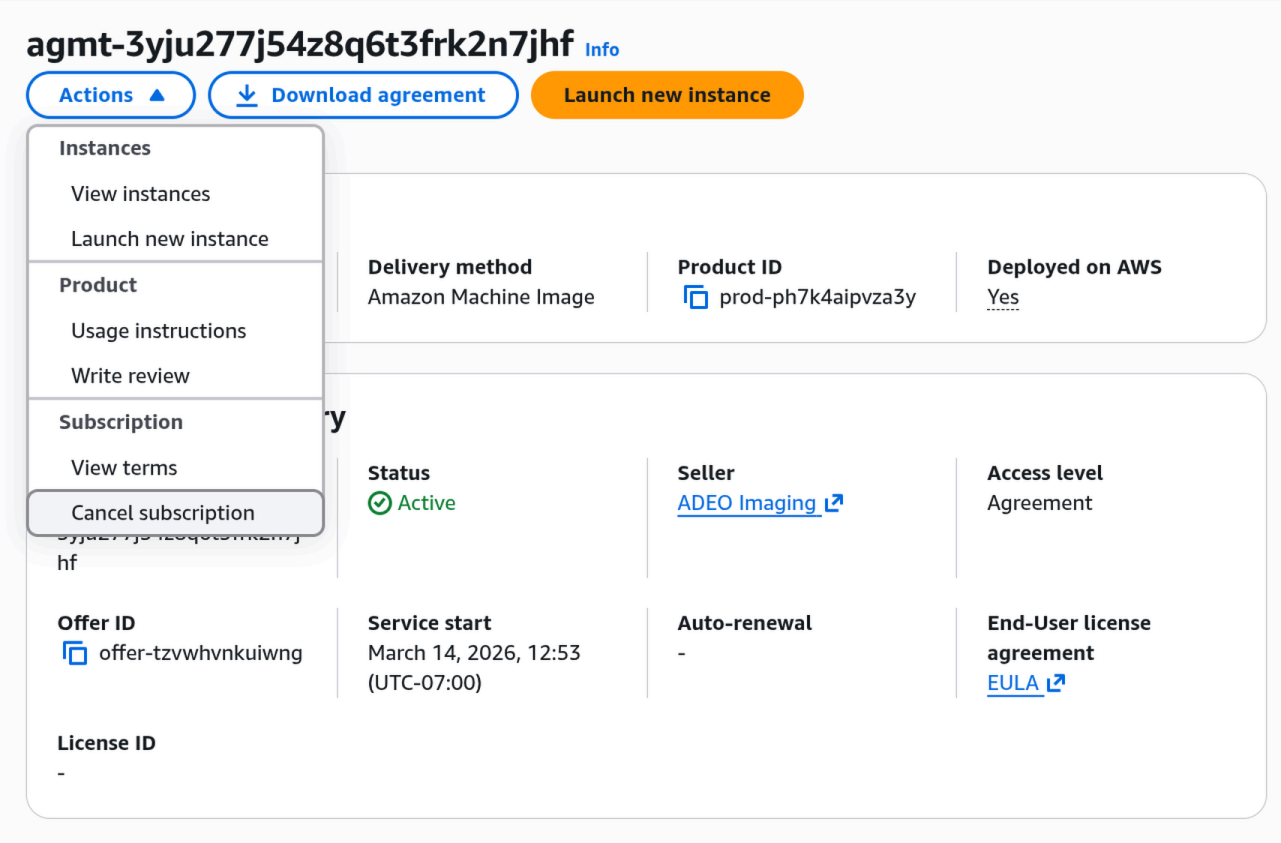
- On the subscription detail page, click "Actions" in the top left, then select "Cancel subscription" at the bottom of the dropdown.
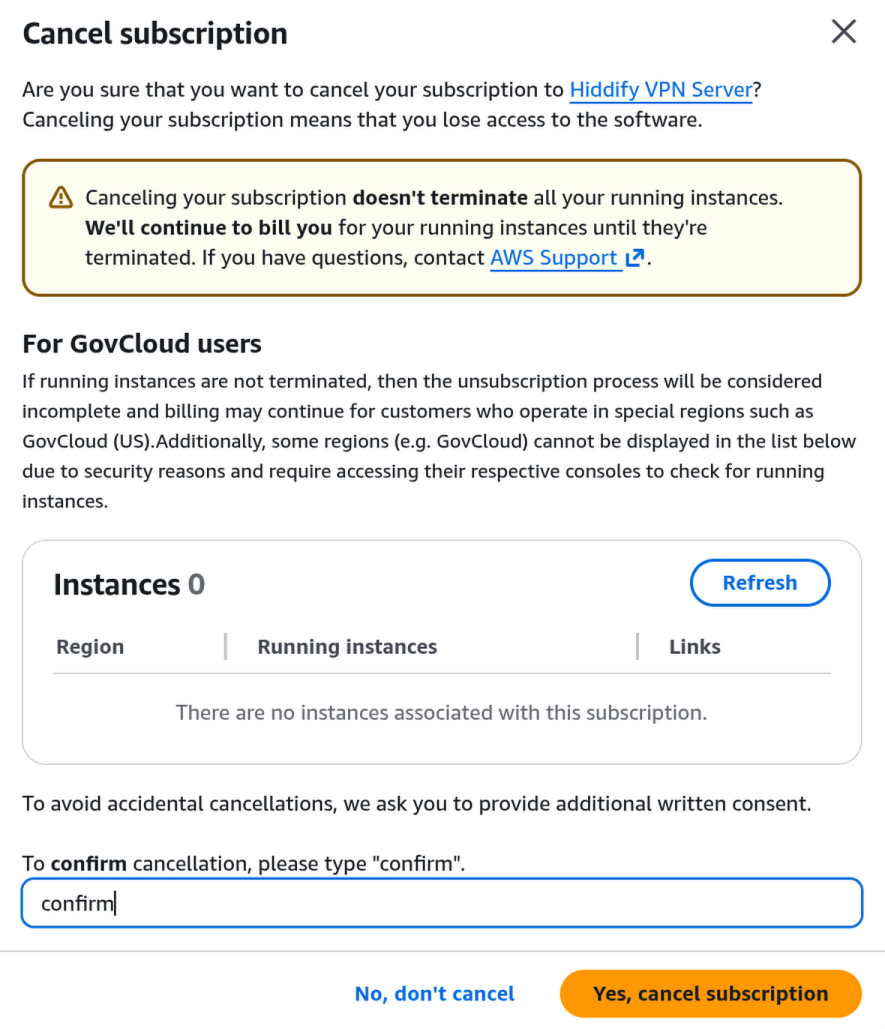
- A confirmation dialog will appear. It will show "Instances 0" (since you already terminated the server). Type confirm in the text box and click the orange "Yes, cancel subscription" button.
حذف سرور:
- به صفحه EC2 Instances در کنسول AWS بروید.
- سرور Hiddify خود را در لیست پیدا کنید و روی آن کلیک کنید.
- روی دکمه «Instance state» در بالا سمت راست کلیک کنید.
- از منوی کشویی «Terminate (delete) instance» را انتخاب کنید.
- گزینه «Skip OS shutdown» را تغییر ندهید. روی دکمه نارنجی «Terminate (delete)» کلیک کنید.
هشدار: این عمل قابل بازگشت نیست. سرور و تمام دادههای آن برای همیشه پاک میشوند.
لغو اشتراک مارکتپلیس:
- به AWS Marketplace Subscriptions بروید.
- روی «Hiddify VPN Server» در لیست اشتراکهای فعال کلیک کنید.
- روی «Actions» در بالا سمت چپ کلیک کنید، سپس «Cancel subscription» را از پایین منو انتخاب کنید.
- در پنجره تأیید، کلمه confirm را در کادر متنی تایپ کنید و روی دکمه نارنجی «Yes, cancel subscription» کلیک کنید.
تمام شد. دیگر هزینهای از حساب شما کسر نمیشود.